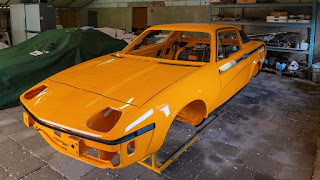
With my holidays almost over I returned to the shed for a job that has been postponed several times in the past year. Fitting the striping to be precise. Early in the year I decided to remove the striping from the bonnet and change the pieces for the wings. Sadly though a friend who has the gear to cut the new items had run out of black self-adhesive foil. As it is easier to apply all parts in one go, I decided to wait with applying the remaining striping parts and decals till everything was ready. Fast forward 7 months and the new stock of black foil still hasn’t arrived! So I reversed the decision, and went to the shed armed with kettle, washing liquid and other household stuff. And the various parts for the striping of course.
I decided to start with the striping for the right hand rear wing. After washing off any dirt or dust, de-greasing and applying some soapy water the striping was put in place. Aligning went pretty smoothly. When I “designed” the striping, I used the door handles and the top of the door running parallel with the door handles as datum lines. With the stripe running in a straight line, parallel to these lines, from the rear wing to the front of the door.
With the stripe correctly positioned it was time to get an old ID card and the hairdryer out. And with most off the water rubbed from underneath the foil, it was time to gently pull off the backing foil. And that’s where it went wrong! I wanted to work from back to front, so the bottom of the downward part would remain in place and any stretch could be dealt with at the door gap. But whatever I tried the backing foil in that area refused to come of the striping. And working from the other side immediately stretched the two thin outer stripes. A long story short: Waste bin 1 – Car 0!
Normally at this point you walk away from the
job for a while. Sadly that doesn’t work when you’re working in a shed, away
from home. So the only option left was to carry on with the remaining pieces.
Just to be sure it wouldn’t happen again, I cut the backing foil right back to
the striping. And hoped for the best. Though slightly nerve racking, this time
the initial plan worked. Hooray!
Only three items left. Next in line was the striping for the bonnet. I fitted that already a few years ago. But then I noticed that one of the two stripes wasn’t fitted perfectly. So that needed rectifying! And as these pieces were much smaller they were far easier to handle and apply. (sorry, I should have taken a picture with the bonnet up 😜)
That left me with one final piece, and also the smallest. A small “SPRINT” decal. This is actually a left over from one of the door stripes. But I thought it would look good on the boot lid. For its position I followed the dimensions for the “TRIUMPH” boot lid decal of the later Canley and Solihull cars. And of course the early “TRIUMPH TR7” decal (with a twist) already in place. So now you don’t have to overtake me to know what’s under the bonnet 😁.
That leaves me with the job of producing the stripes for the front wings and the right hand rear wing of course. With some spare decals thrown in. And a different font for the TR7 on the rear wing. See how that looks in real life. Hopefully to be continued very soon!
Back to my regular work tomorrow. It was a productive month!


No comments:
Post a Comment