Showing posts with label Sprint engine. Show all posts

Sunday, 27 April 2025

A TR7 filled weekend

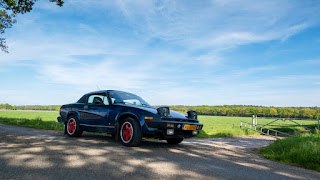
Last week I managed to fit the new water pump. And this weekend I found some time to fill ‘t Kreng’s coolant system. And after leaving it overnight I found no leaks. Looks like a result!


So the final job for the Sunday morning was refitting the carburettors and the strut brace. After which it was time for a short 50+ kilometres test drive. And the car certainly did her name proud. After only a few kilometres the Low Coolant warning light came on! As the temperature gauge wasn’t even at its normal working position I decided to ignore the light for the time being. And sure enough the light switched off again a few seconds later. And the temperature gauge rose to it’s normal working position and remained there for the rest of the drive.
As it already was late in the afternoon the roads were fairly quiet despite the glorious weather. Time to enjoy the fine spring weather and the car’s still razor sharp handling.


And when I returned home early in the evening the much dreaded check for any leaks. There was a slight hissing sound coming from the hose connecting the header tank with the radiator. As that hadn’t been touched during the work carried out over the past few weeks, and there was no visible leak, that was ignored. But there was a tiny trace of coolant from the weep hole underneath the water pump. See how that develops over the coming weeks!

Another job on a rather TR7 filled weekend was preparing my last spare body for transport over to the work shop next weekend. This body is rust free but has extensive and badly repaired accident damage to the left hand front of the car. So this body will supply the necessary parts that will be needed to repair the various rusty areas of my DHC.


Sunday, 14 July 2024

Finishing ‘t Kreng’s water pump: take 3

It’s been a while since my last post. Not that I have been idle, but because ‘t Kreng’s cooling system has been putting up quite a fight. I left this job with “only the coolant hoses and the carburettors left to be fitted. Glad I only fitted the coolant hoses and then started filling up the coolant system. Sadly by the time the coolant level reached the infamous connecting tube UKC2538 the coolant started to leak out, not good. Time to call it a day and have a few beers!
After visiting the shed a few days later to collect my trolley jack I found back some motivation to carry on with the job! The sooner ‘t Kreng is back on the road the sooner I can continue work on the ’76 car!


And when I got home the inlet manifold was removed. But on closer inspection I couldn’t find anything wrong, though there had been a little lack of resistance when pushing the manifold onto the connecting tube. Time to order some new O-rings in the correct diameter just to be sure, taking the necessary measurements from the various parts. And more waiting for parts to arrive.
In the end the O-rings arrived after two and a half weeks! And they indeed were slightly larger compared to the ones supplied some time ago from a UK based parts supplier. Time for the second attempt to fit the inlet manifold. This time there was a noticeable increase in resistance while mating the manifold to the connecting tube. But again no success! While pouring coolant into the system through the thermostat cover a leak sprang from the connecting tube as soon as the level got above the top of it. Some expletives were uttered! At least the water pump itself was still leak free.


And time to remove the inlet manifold again. This time the cause for the leak was rather obvious. The upper O-ring had caught the edge of the manifold opening and got partially dislodged. Time for take three. But first I had to order a new manifold gasket as the “old” one got damaged while removing the manifold.


Sadly I was again let down by a supplier or courier. The gasket should have arrived on Saturday morning at the latest. It didn’t. As the car is booked for its biennial MOT this Wednesday I couldn’t wait much longer. Luckily I stumbled upon a long forgotten stock of gasket paper with different thicknesses, hidden in the attic. So I had a go at making my own gasket. Using the old item plus the inlet manifold as templates. Fairly straight forward, but time consuming. And as it was late in the afternoon by now I decided to call it a day. Oh and I forgot the pictures of the finished product.
So this morning I had a fairly early start for my third attempt. I have to admit that I had used some of the time while waiting for parts to arrive to work out a plan to fit the manifold. In the end I decided it would be better to put the connecting tube into the manifold before adding the manifold to the engine, using telephone pliers to keep the tube as low as possible in the manifold while adding the lower part of the tube into the water pump cover.
And with the manifold and home-made gasket roughly in place I could again start fitting the stainless bolts. These were chosen to reduce galvanic corrosion between steel bolts and alloy engine parts.


Everything seemed to go well, but when adding the second to last mounting bolt, it didn’t want to go in properly. I managed to get it in by hand in the end but it felt as if the thread in the head is on the way out. So I was rather careful to (over)tighten it. Next time the manifold comes of said bolt hole will probably need a thread repair.


And with all bolts tightened up it was time for the dreaded final task. Filling up the system with coolant. I again decided to fill it through the thermostat cover. But when the thermostat house was starting to fill up there was the dreaded sound of escaping coolant. Luckily it turned out to be coming from the coolant hose that runs between the thermostat and the radiator. This was still fitted to the radiator, but the other end was resting on the water pump cover. And after cleaning of the coolant I could conclude that the tube seemed to be waterproof. Result!


Left me with the rather relaxing job of refitting all hoses, the carburettors and the strut brace. But not before these were treated to a good clean.


Final job for tomorrow evening will be topping up the coolant level and hopefully a test drive to see if everything still works as it should.


Update 15-07-2024: Tonight I first checked the coolant system for leaks (there were none) and topped up the coolant level. And after expelling any trapped air and checking the fuel lines for leaks under pressure, it was time for the final test, starting the engine. It started promptly after which I let it run till the temperature gauge reached the ¼ mark. And after that there was the much dreaded final inspection for any leaks. So far everything is dry. A test drive is scheduled for tomorrow evening, and MOT on Wednesday. And hopefully time to enjoy the car afterwards!

Sunday, 15 October 2023

FHC resto nr. 155; 10 Years into the project


The coming week (on October the 17th to be precise) it is exactly 10 years ago that I purchased my last TR7. A pretty early Dutch FHC which was first registered on the 6th of October 1976. It left the factory clad in a Pimento Red (CAB) coat of paint and was fitted with a black cord (CPAA) cloth interior.
I actually stumbled upon the advert for this car while I was doing my periodic internet search for a set of Wolfrace Turbo wheels for my DHC. The rest is history as they say!

2013-10-12 After a short test drive to get an indication of the cars mechanical parts,
before agreeing on the actual purchase;

The original plan was to give it a proper service, a few repairs where necessary, a fresh MOT, and sell it on minus the Wolfrace wheels. But I was never any good at selling cars. And I have always been longing for an early Dutch registered Speke built TR7. Mainly because I really have come to like the clean lines of the early bonnet design.
So I decided to restore it to a more or less standard looking car, with a few (reversible) period detail changes incorporated in the process. And the schedule wasn’t too ambitious either! It should be completed by the time the car became tax exempt some three years later.


Sadly life (and death) intervened several times in the past years. As a result of which the car is still not finished 10 years on! Though I am getting there slowly but surely. At least this 10 year “jubilee” gave me an excuse to trawl through the well over 2000 digital pictures shot so far during the restoration. And post this pictorial summary of the work done so far. In chronological order;

2014-01-29 Removal of the engine while dismantling the car,
in preparation for the body repairs;

2014-02-12 The empty shell remaining after dismantling of the car was completed;

2014-03-15 While the body was away for paint removal and shot blasting,
I started on various parts needed in future. The rear suspension in this case;

2014-03-29 The drivers footwell after shot blasting;

2014-03-29 The left hand front inner wing area after shot blasting;

2014-03-30 Another part that arrived well ahead of schedule;
a slightly customised 14” Moto Lita MK4 steering wheel;

2014-05-24 Reconstructing the incorrect small fuel filler rear deck,
and the heavily butchered boot floor;

2014-05-28 Rear deck and boot area finished;

2014-06-11 Adjusting the left hand door gaps;

2014-06-25 Repairs on the right hand inner front wing area;

2014-07-10 Welding finished and waiting for final shot blasting
and coating with a primer;

2014-07-30 The refurbished seats covered in a specially woven red/black McBeans tartan;

2014-07-30 Recovered GRP parcel shelf;

2014-08-20 One of the repaired doors after returning from E-coating;

2014-09-09 Traditional paint preparations, filling and smoothing the roof;

2014-10-11 The car’s chosen colour combo;

2014-12-11 Nearly ready for painting;

2015-01-10 Applying the anti-chip coating to the body’s
underside in preparation for painting;

2015-01-19 Ready for painting bottom and inside;

2015-02-05 After the first visit to the painters. The interior, the engine bay
and the underside painted in lovely and bright “Nearly-Topaz-Orange”;
I have since found out that RAL2000 Yellow orange is a pretty close match.

2015-06-12 Home made striping and decals ready for application;

2015-06-13 The body, doors, boot lid and bonnet are ready for painting;

2015-09-08 Painted in its chosen colour at last, and waiting for the
satin black paint to be applied to the sills and the rear light panel;

2015-09-14 Back in the shed in lovely “Nearly Topaz Orange”;

2015-12-22 Fitting the sound deadening (or anti resonance) pads to the interior;

2016-01-09 The original VIN plate and body tags,
clearly not fit to be reused on a fully restored car!

2016-01-14 One of the little projects that got out of hand a little, especially time wise.
Remanufacturing the body tags (with a twist) and the VIN plate.
The joys of modern software and online remanufacturing possibilities;

2017-05-10 The refurbished early Speke model throttle pedal;

2017-05-21 The refurbished parts for the pedal box, plus a few new ones;

2017-06-03 The inside of the newly coated fuel tank;

2017-12-20 The small parts shot blasted in preparation for plating;

2018-01-04 The small parts after zinc plating and (black) passivating;


2018-01-10 Refurbished gear box extension;

2018-03-31 The end of an era and a sad farewell. Clearing out the shed at René’s premises,
after he passed away. It was also the first time I saw the body outside in bright sunshine.
It did cheer me up a little;

2018-09-14 The refurbished head lamp supports;

2018-10-06 Fuel tank and fuel filler neck in position;

2019-01-06: Refurbished parts for the boot lid lock mechanism;

2019-03-23 Pedals and refurbished heater fitted;

2019-12-08 Refurbished parts for the door handles and ignition lock;

2020-02-27 Modern aftermarket (Volvo/BMW) brake light switch fitted;

2020-02-29 Fitting a few exterior trim parts;

2020-03-15 The new heart for the car, a NOS Sprint short engine
(with Mahle pistons!) and cylinder head;

2020-05-09 Adapted Allen head bolts for mounting the ignition switch;

2020-06-01 Cleaning and detailing the front side lamp lenses;

2020-09-23 Spot the problem! A water pump cover that escaped British Leyland’s quality control!
Needles to say I opened up the blocked passage leading to the radiator

2020-09-24 Refurbished water pump cover and a very rare original TR7 Sprint water transfer housing.
And yes the blocked opening of the pump cover was opened up;

2020-09-29 Fitting the homemade decals to the boot lid;

2020-09-27 And fitting part of the striping to the sides of the car;

2020-12-06 The refurbished front side lamp units;

2020-12-12 The side lamps fitted to the front bumper;

2020-12-19 Detail of the striping on the front wing and bonnet area;

2020-12-19 The striping running along the left hand side of the car;

2021-02-13 In the shed and the winter Sun just catching the vibrant paint work;

2021-05-10 Remanufactured alloy 5-speed shift pattern on the gear lever knob;

2021-05-13 Completed Sprint/SU inlet manifold, including my own design
alloy carburettor mounts and insulation spacers;

2021-07-06 Detail of the home made nose decal;

2021-11-13 Close up of the early type bonnet safety hooks;

2021-11-13 Brake balance valve and cunifer brake pipes;

2021-12-24 Remanufacturing the brake pipes for the back axle
using conifer pipe (top is the original);

2022-01-07 Locally fabricated stainless flexible brake hoses;

2022-01-08 Fitting the brake pipe running from the brake balance valve to the back axle;

2022-07-31 Refurbishing the engine harness (RKC 5511);

2022-09-28 Refurbishing the main harness (PKC 1946)

2023-01-21 Notes to help me refitting all the wires in
the correct order in the various connector blocks;

2023-02-22 The refurbished fuse box in the main harness (PKC 1946)

2023-05-20 The main harness in position, seen through
the opening for the right hand head lamp pod;

2023-10-08 Original pattern remanufactured door seals fitted;

Looking back over the past 10 years there have been a fair amount of ups and downs. But overall I am well pleased with the work done so far. And stating the obvious; I’m really looking forward to get the finished product back on the road. And that moment is slowly but surely drawing near!