Showing posts with label Dashboard. Show all posts

Saturday, 4 May 2024

FHC resto nr. 161; Facia switch panel

The connector blocks of the four dashboard switches.
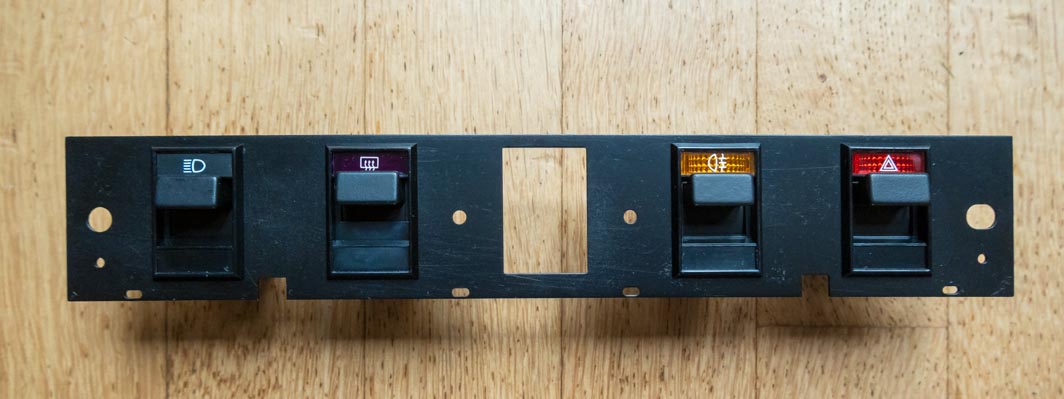
As they will be fitted to the car from left to right;
the light switch (TKC3963), heated rear screen switch (TKC3965),
fog light switch (TKC3964) and hazard light switch (TKC3962)

Almost finished the dashboard switch panel. In my last post I got as far as dismantling the switches and making a start on cleaning and refurbishing them. Today I managed to finish the switches. First job being cleaning the connector blocks.
At first I thought it would suffice to polish the contacts with a fine sanding brush on my Dremel drill. But there was to much grease on them. So the connector blocks also got my standard cleaning treatment (hot soapy water and brush) to get rid of the grease residues. After which the various contacts could be properly polished.

Light switch (TKC3963)

Heated rear screen switch (TKC3965).
Now with matching purple lens!

Fog light switch (TKC3964)

Hazard light switch (TKC3962)


After which the various contacts were lightly greased were necessary, using various types of traditional switch gear greases depending on function. So Vaseline for protecting the surfaces from corrosion and high temperature non-conductive grease to lubricate the toggle pins and springs. This turned out to be more time consuming than expected. But eventually all switches were reassembled and could be fitted to the mounting plate.


Final job should have been fitting the illumination strip and the facia panel. But after cleaning the illumination strip, I noticed that the paint on some of the lettering had come of and needed filling in. Luckily I still have some fine paint brushes and white enamal paint. Now waiting for the paint dry, after which the excess paint can be polished off and the switch panel can be finished.


Wednesday, 31 August 2022

Ready for the 10CR?


One very vital but also rather boring and time consuming part of next week’s 10 Countries Run was finished yesterday. Checking the satnav files, copying the road book to some maps and loading the various GPX files to my TomTom over the weekend. Hopefully we won’t be needing the atlas but I always find it somehow reassuring to have maps at hand in case all else fails and a road is closed for whatever reason!


And as mentioned in my previous post I found out the lock nut for the left hand steering rod end was slightly loose. And today being the first day of my vacation, I decided to take the car to a friend’s workshop, to have the front suspension’s alignment checked. Glad I did! The tracking indeed was out a bit. Not by a huge amount, but it could have been enough to cause problems over the distance that the car will be covering next week.
The final job for the first day of my vacation was cleaning the car’s interior and impregnate the leather of the seats with some hide food. Rather time consuming and a bit messy 😶


Remains the question how the brakes performed. To be continued!

Saturday, 11 December 2021

Glove-box-lock failure

During the final route check of our recent Nachtrit something inside the mechanism of the glove box lock broke. As a result of which the glove box lid couldn’t be opened anymore. The cause for the failure became clear immediately after I got the lid open. The back of the lock carrier was torn open.


This was most likely caused by the weight of the trip meter fitted to the lid for the past 20 odd years!


But it didn’t fully explain what really had failed. So time to dismantle the failed lock mechanism. It even took me a few seconds to work out what really was broken. Can you spot it?


The anoraks will have noticed by now that something’s missing from the rear of the turning knob/lock barrel carrier (bottom picture 2nd row left). The rear has been torn clean off (bottom picture top row 2nd from the right). And as such the cam at the end wouldn’t move anymore to operate the lock’s plastic latch. Now looking at alternatives to get the strain of the newly fitted lock. So to be continued.

Saturday, 10 August 2019

10CR Preparations (#2)

Or the list gets of things-to-do before the 10CR gets shorter, does it really? Well with most of the work on the dashboard finished, the work on the interior was interrupted for a very brief period. This was because I received a small packet containing a set of plastic M4x20mm Allen bolts for the rear number plate lights.


These were to replace the steel ones I fitted as a stop gap solution … almost 10 years ago! But as a tiny fracture was starting to appear on one of the lights I thought it better to replace the steel screws with something resembling the original fasteners. Fitting these was fairly straightforward, though I had to be careful not to overtighten them. The plastic (PE) bolts have a fair amount of resistance inside the spire clips. But I managed to screw them all home without breaking one. These should keep the light armatures in place without damaging them. On the left the old steel screws, on the right the new plastic bolts.


With this small job finished it was time to carry on with where I left the interior. Over the years the instrument cluster illumination hasn’t been as it should be, with half of bulbs often not working properly. So I decided to have a look at the instrument cluster in detail, and the printed circuit in particular. And there was some light wear and damage visible at various locations on the circuit:


Luckily I had a late instrument panel lying around from one of the US spec cars I broke in the past. And this panel had what  looks like a far better circuit:


The original plan was to remove the printed circuit from its moulding and fit it to the original panel of the car. But then I noticed that 2 of the 4 slots, that keep the lower edge of the instrument panel’s plastic screen in place, were broken. Luckily I knew all instruments of the donor panel were in working condition when I removed them from the car in 2008. Time for a change of plan! Which meant cleaning the donor panel, getting rid of its silly US spec 80 MPH speedo, and replace it with the original one from GB-16-YP.


The final job for the day was left till last, replacing the bulbs for the instrument illumination. I could have left the original spec bulbs (T10 3W) in place. But I thought it a good moment for an upgrade. I have been toying with the idea of replacing the bulbs for something better for some years. And with the dashboard out I decided the moment was there for the upgrade, green T10 LED lights.


Turned out to be a very straightforward to fit them. Though they looked taller compared to the original spec T10 bulbs, they were not. So the green domes could be left in place. Not really necessary, but these might dampen some of the LED’s intensity. I will find out as soon as the instrument cluster is back in place! Soon to be continued …


Friday, 9 August 2019

Fitting new GPS part 4

Slow but steady progress on the car’s interior over the past week. After refitting the main body of the dashboard, last weekend I decided to first mount the steering column switches. But not before checking everything (that could be checked) functioned as it should of course. And this time the column switches’ shroud went on without any problems. That has been different in the past!


With the column switches in place and its wiring connected, I moved over to the passenger seat again.  Now for the most important task of the install, providing the GPS’ docking station with a power feed.  For this I only needed to untangle the wires that hide there. Though it looks much worse in the picture above. Nevertheless it took me well over an hour to find a proper connection point and connect the GPS’ wires to it. Followed by that dreaded moment of switching the power on  … will it work? Well it did! After which the struggle to put the centre console back in place could begin. It’s always a bit of a challenge to keep the wires out of harm’s way while at the same time trying to keep the loom for the radio accessible in the confined space. But after some 15 minutes off careful trial and error (including some swearing) the console assembly was back where it belongs.


Cleaning and putting back the armrest/cubby box and gear lever surround was straightforward and easy after that. As was cleaning, greasing and refitting the gear lever. Even the anti-rattle spring went in at the second attempt. Decided to rotate the gear lever 180° so the anti-rattle spring can try to wear out a new mark in the gearbox extension. Final job of the day was cleaning and reconditioning the leather of the gear lever gaiter and fitting the wooden Nardi gear lever knob.


Sunday, 4 August 2019

Fitting new GPS part 3

I left you a few days ago at the point where the dashboard had been removed and the GPS docking station had been fitted to the dashboard. But without the pictures to go with the actual fitting of the docking station. So I’ll start there. As the theory behind the mount and the detailing has been explained in this previous post, I will leave it to some pictures to illustrate how the theory looks in real life …


With this part of the job completed I started at inspecting the car’s wiring in the centre console and fuse box area, in search for a good power take off point for the docking station. But first I had to find a way of removing the radio unit. As I still haven’t found the keys to remove it from its mounting shroud, I went for plan B. I turned the complete centre console assembly onto the transmission tunnel. This way I could easily access the locking tabs in the shroud with some feeler gauges. After which it was easy to remove the radio unit
After that I also cleaned up a few points that didn’t go to plan when I restored the car some 10 years ago. At the time I fitted some additional (green) LED lights to aid finding dropped items on the floor, and have some light in the glove box, in the dark. But for some obscure reasons the co-drivers side never worked. As I didn’t fancy removing the dashboard for that I left it there. But with the dashboard removed I could assess the problem. So I rewired that side and added some extra light to the driver’s side too. The lights are switched through the original A/C switch, as it is a suitable on/off switch that was there already! Added bonus is that it is easily accessible for both driver and co-driver.


And after a few hours of sorting through the wiring it was time to get the main part of the dashboard back in the car. This should be a straight forward job. But in my case some of the non-original wiring usually gets in the way. Or as was the case now a connector came loose. Luckily the dash wasn’t bolted down at that point, so easy but time consuming to rectify. But by the time I had secured the top of the dashboard it was time to call it a day ...


Wednesday, 31 July 2019

Fitting new GPS part 2


After enjoying the car over the past two evenings, I started in earnest with the car’s preparations for this year’s 10 Countries Run today. And I started with a job that I have postponed for a pretty long time, fitting the loading and mounting dock for the “new” GPS device. Why? Because I hate removing the dashboard of these cars. Not that it is a difficult job, but rather time consuming. And there will always be a few things that will throw up a fight. Mostly because they are difficult to get to. So I came prepared and had scheduled to only remove the dashboard from the car today, and start fitting the GPS dock this weekend.

The first part to throw up a fight was the gear lever surround. As usual that refused to cooperate. But it needs to come out before you can access the centre console. Quickest and easiest way to remove the surround is disconnecting the handbrake cable from the back axle so the hand brake lever can be pulled up higher, giving enough clearance for the surround to be removed.


With the surround out of the way I removed all fasteners from the centre console. But left it in place because there are a lot of electrical connections hiding behind, including the radio. Of which I am still searching for the keys to remove it! Instead I decided to remove the steering wheel and the column switches in preparation for the dashboards removal. And after an hour and a half all fasteners were removed and connectors disconnected. Of course a lot of pictures were taken of how wires were connected, and all screws and bolts were stored per part or area of the dashboard.


After which it was finally time to remove the dashboard from the car. Leaving lots of space around the heater and a boot full of parts.


As I was by now well ahead of schedule I decided to have a go at mounting the GPS’ docking station. I had mentally prepared that this would be difficult and it was. But as I knew what could go wrong that wasn’t much of a surprise. And by the end of the afternoon the docking station was fitted to the dashboard. Sadly the mobile phone I was using as notebook (Samsung S8 Edge) decided to randomly add various effects to the pictures, which I didn’t ask for. So I owe you these images!

Thursday, 23 March 2017

FHC resto nr. 51; Parts coating


A few weeks ago the repairs to the air-box-lid were finished, so all parts that should be powder- or E-coated were ready. And I am glad that I managed to drop of this batch of parts for paint removal, shot blasting and coating yesterday. It was slightly later than planned, but that's the price you pay when you have to much spare parts to search through. And the fact that these parts are spread over three locations and two countries doesn't help here either. But in the end I got everything sorted. A small selection ...


And to prevent any mistakes as to what part should get which coating or colour I decided to make an inventory of all the parts (Those of you who have been following this blog will notice that there are also a few parts there that will be used on my other TR7's)...


Added advantage is that both the coating company and I have a checklist to work from. And thus it should make life a lot easier. And if all goes to plan all parts should be ready within a week or two. When they return I can start on some proper restoration jobs, like assembling the heater, and cleaning and coating the inside of the fuel tank.


As you can see it looks pretty solid from the outside, and it was actually rather mint on the inside too when I pulled it from the car. But some 3 years in storage has resulted in a fair amount of surface rust on the inside. So once it returns I'll have to visit a local supplier to get me some Tank Cure to attack the inside!