Sunday 25 August 2019

10CR Preparations (#5)


Or the list gets shorter! Clearly the car’s exterior needs a good clean as it has become rather dusty. But that will be the last job! With all of the important jobs done (hopefully), the plan was to drive the car as much as possible. Alas! So far that hasn’t been going to plan. I only found time for a fairly short trip over a week ago. But the weather wasn’t to photogenic, so no proof of that. But one of the first things I noted was that the fuel gauge’s behaviour hadn’t changed. Which almost certainly means it is a  problem with the fuel tank’s sender unit. So that’ll have to wait till another time …
The subsequent weekend’s weather wasn’t what you’d call nice to take a DHC out to enjoy! So last Wednesday I decided to use the car for a work related trip to the northern part of our Province. That didn’t go to plan, but luckily that had nothing to do with the car. But at least because it got pretty late, I was able to drive 
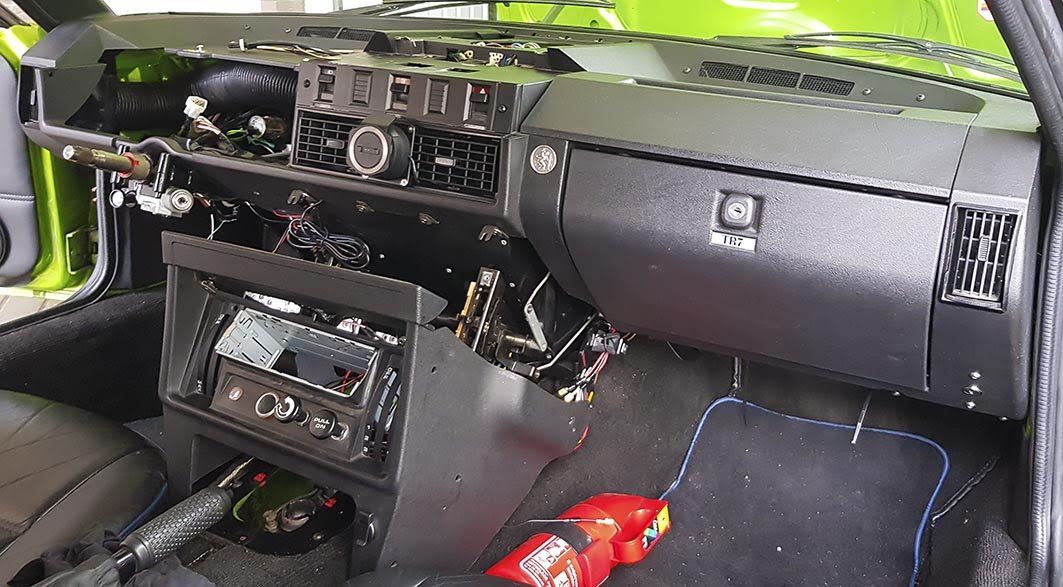
the car under night time conditions. This enabled me to find two small faults. First one being that only three of the four LED’s for the dashboard illumination are working. But as they are much brighter than the original bubs I have decided to leave that for the time being.
The second problem I found while driving home was that I was followed by a bright red glow. Turned out that the brake lights were burning constantly. This must have been caused while struggling underneath the dashboard when trying to get two bulbs from the instrument cluster working. At least this one was easily sorted by bending the brake switch’s bracket back to its original shape!


And while working in the driver’s footwell I had a look at the throttle pedal. Unhooking the throttle cable showed that the grease I put in there some years ago still was doing its job. The pedal’s movement was light and smooth, so no further action needed there. Only needed a tiny adjustment on the throttle pedal’s stop to get WOT. Probably caused by a slight stretching of the throttle cable over the years? Time for more checks underneath the bonnet:


First port of call was the throttle linkage between the carburettors. Nothing wrong at that end of the throttle cable:


And as I was in that area of the engine bay I gave the infamous hole underneath the water pump a quick inspection. Everything’s fine there, with no signs of any leaks:


Another check had to do with the brakes. And the fluid level to be more precise. This had dropped clearly, but not alarmingly. I put it down to the brake pads bedding in. But I did check all connections just to be sure (and for peace of mind). No leaks were found.


The final check was for the air filters. Those who follow my ramblings on here will know that I moved the air filtering (in the shape of two K&N cone filters) to the nose of the car. Here they have been effectively cleaning air over the past few years. And although slightly dusty they didn’t need any attention yet.


A more time consuming item on the list were the seats. They were recovered in black leather somewhere in the mid 90’s and fitted to ‘t Kreng but soon stored in the attic for future use as they were not supportive enough for the car’s potential. After lingering in the attic for many years they were fitted to the DHC in 2010. And since then I only cleaned them once. So time for a thorough clean and a treatment with a leather re-conditioner.


Not the nicest of jobs to perform, especially as the seats are sitting pretty low when the car is on the drive! And the outside temperature was on the wrong side of the scale for me! But after a few hours of elbow grease the seats looked and felt much better. I also used the opportunity to clean the rest of the interior!


And final job for now was the purchase and fitting of the motorway vignettes for Switzerland and Austria. At least that was easy!


So the list has become much shorter:
  • Check wear pattern on front brake pads and address some light squealing under light braking;
  • Give the car a good polish and check tools, spare parts etcetera;
  • Drive the car some more and final checks;
  • Load the four stages of the route into the GPS and copy the route to a road atlas as back-up (just in case);
  • Buy and fit motorway vignettes for Switzerland and Austria;
  • Fuel gauge, the old unit was registering almost empty constantly. See what the change of instrument cluster has had on this fault, I suspect the sender unit in the tank though;
  • Clean the leather seats and treat the leather with a conditioner;
  • Check if the carburettors throttle’s open fully and lubricate linkage and throttle cable;


Thursday 15 August 2019

10CR Preparations (#4)


It hasn’t been going to plan last week, with most jobs taking more time than planned. But earlier this week I managed to delete another item from the list. But not before an important shopping trip with the Defender 😋


Last week I thought there might be a problem with the main earth points, but on closer inspection it turned out they were all in perfect condition.


This together with two very lazy and out of sync headlamps last Sunday made me take out the multi meter again. And sure that showed what I was expecting by now. Despite hardly any use since my last drive, and with the battery switched of in between, it showed 10,4 Volts now. A drop of a little over 2 Volts in less than two weeks’ time. And during the last two outings the voltmeter had been reading as it always has done. So that should rule out the alternator. Time for a check of the by now just over 9 year old battery at a friend’s workshop on Tuesday. Voltage had now dropped to 8,1 Volts. But more importantly, of the cranking power of 330 A nothing worthwhile survived. Time to say farewell to this battery and get a new one!


Plan for the Wednesday was to put the battery in, and enjoy the car for a few hours. But that was not to be. While cleaning the battery area, I decided it would be better to use the available time to give the car a general check over. I started with a thorough clean of the breather catch tank. Turned out to be rather full of water and oily gunge, which took quite some time to remove (I made a mental note to drain it more often!).


But refitting it also took much longer than expected as one of the bolts at the front of the cam cover didn’t want to go back in properly (I had to remove them because the hose from the cam cover to the breather tank was fitted to these bolts with stainless P-clips). In the end I decided it would be better to remove the cam cover and put in a re-coil to the bolt hole. But with the can cover removed I could wind the bolt fully down in small steps. Though initially it was very heavy. But in the end it turned out the thread was in fairly good shape. And the cam cover could be re-fitted without any further problems. At least it gave me an opportunity to inspect the cam shaft. Nothing wrong there. Actually looking pretty good for a 25 year old engine which has done well over 100.000 kilometres!


After which it was time change the gearbox oil. Before starting with the breather tank, I had removed the drain plug from the ‘box. So it could drain while I was working on different parts of the car. Turned out there was some swarf on the plug. But not too bad. And the drained oil didn’t look to bad either, with no particles visible there. The plug after removal and after cleaning:


Re-filling the gearbox with new oil was rather straight forward as ever. Measure the correct amount of oil (Castrol Syntrans 75W-90) and let gravity do all the work:


With the car jacked up and the gearbox topped up, I also gave the prop shaft's grease nipples a few squirts of grease, another item of the list. So the list now is as follows;
Check wear pattern on front brake pads and address some light squalling under light
braking;
  • Check if the carburettors throttle’s open fully and lubricate linkage and throttle cable;
  • Clean the leather seats and treat the leather with a conditioner;
  • Fuel gauge, the old unit was registering almost empty constantly. See what the change of instrument cluster has had on this fault, I suspect the sender unit in the tank though;
  • Buy motorway vignettes for Switzerland and Austria:
  • Load the four stages of the route into the GPS and copy the route to a road atlas as back-up (just in case);
  • Check and probably replace battery;
  • Clean the contact areas of the three main earth point on the car’s engine;
  • General service and check of all mechanics, including greasing the prop shaft and a check for any leaks;
  • Oil change for the gearbox (Castrol Syntrans Multivehicle 75W90);
It’s now about time I take the car out for some test runs and to enjoy it!


Sunday 11 August 2019

10CR Preparations (#3)

Just over three weeks to go before the start of Club Triumph’s 10 Countries Run!


There was only what looked like a few simple jobs left on the dashboard for today. But it took me a fair part of this Sunday to get everything back where it belonged. Especially the instrument cluster decided to put up a fight, which it lost in the end. But it all took much longer than planned.


As a result a thorough test of everything will have to be carried out the coming week, instead of this afternoon. Which will also see some more work on “The 10CR List”!  Also decided last week it might be a good idea to put a notepad in a strategic position. This enabled me to write down all those small jobs that have to be done before the 10CR, and spring to mind randomly. And often are forgotten pretty quickly! together with my previous published list it looks like a lot of work still! Though I am glad that most of the more time consuming jobs seem to have been completed;
  • Book the various overnight accommodations for the run;
  • Buy motorway vignettes for Switzerland and Austria:
  • Check wear pattern on front brake pads and address some light squalling under light braking;
  • Check if the carburettors throttle’s open fully;
  • Clean the contact areas of the three main earth point on the car’s engine;
  • Clean the leather seats and treat the leather with a conditioner;
  • Disconnect or remove choke light;
  • Fit LED lights (T10) to the instrument cluster;
  • Fit GPS docking station;
  • Fuel gauge, the old unit was registering almost empty constantly. See what the change of instrument cluster has had on this fault;
  • General service and check of all mechanics, including greasing the prop shaft and a check for any leaks;
  • Lubricate the (polyurethane) lower steering column bush;
  • Load the four stages of the route into the GPS and copy the route to a road atlas as back-up (just in case);
  • Oil change for the gearbox (Castrol Syntrans Multivehicle 75W90);
  • Reconnect and adjust handbrake cable;
  • Testing all the jobs done so far or enjoy the car a bit more!
Sadly fitting the PAS-system has been deleted from the list, as till date I haven’t had any news about its status. So that will be for later in the year, as time has run out to fit that to the car (together with an alignment check), and check it is functioning as it should.


Saturday 10 August 2019

10CR Preparations (#2)

Or the list gets of things-to-do before the 10CR gets shorter, does it really? Well with most of the work on the dashboard finished, the work on the interior was interrupted for a very brief period. This was because I received a small packet containing a set of plastic M4x20mm Allen bolts for the rear number plate lights.


These were to replace the steel ones I fitted as a stop gap solution … almost 10 years ago! But as a tiny fracture was starting to appear on one of the lights I thought it better to replace the steel screws with something resembling the original fasteners. Fitting these was fairly straightforward, though I had to be careful not to overtighten them. The plastic (PE) bolts have a fair amount of resistance inside the spire clips. But I managed to screw them all home without breaking one. These should keep the light armatures in place without damaging them. On the left the old steel screws, on the right the new plastic bolts.


With this small job finished it was time to carry on with where I left the interior. Over the years the instrument cluster illumination hasn’t been as it should be, with half of bulbs often not working properly. So I decided to have a look at the instrument cluster in detail, and the printed circuit in particular. And there was some light wear and damage visible at various locations on the circuit:


Luckily I had a late instrument panel lying around from one of the US spec cars I broke in the past. And this panel had what  looks like a far better circuit:


The original plan was to remove the printed circuit from its moulding and fit it to the original panel of the car. But then I noticed that 2 of the 4 slots, that keep the lower edge of the instrument panel’s plastic screen in place, were broken. Luckily I knew all instruments of the donor panel were in working condition when I removed them from the car in 2008. Time for a change of plan! Which meant cleaning the donor panel, getting rid of its silly US spec 80 MPH speedo, and replace it with the original one from GB-16-YP.


The final job for the day was left till last, replacing the bulbs for the instrument illumination. I could have left the original spec bulbs (T10 3W) in place. But I thought it a good moment for an upgrade. I have been toying with the idea of replacing the bulbs for something better for some years. And with the dashboard out I decided the moment was there for the upgrade, green T10 LED lights.


Turned out to be a very straightforward to fit them. Though they looked taller compared to the original spec T10 bulbs, they were not. So the green domes could be left in place. Not really necessary, but these might dampen some of the LED’s intensity. I will find out as soon as the instrument cluster is back in place! Soon to be continued …


Friday 9 August 2019

Fitting new GPS part 4

Slow but steady progress on the car’s interior over the past week. After refitting the main body of the dashboard, last weekend I decided to first mount the steering column switches. But not before checking everything (that could be checked) functioned as it should of course. And this time the column switches’ shroud went on without any problems. That has been different in the past!


With the column switches in place and its wiring connected, I moved over to the passenger seat again.  Now for the most important task of the install, providing the GPS’ docking station with a power feed.  For this I only needed to untangle the wires that hide there. Though it looks much worse in the picture above. Nevertheless it took me well over an hour to find a proper connection point and connect the GPS’ wires to it. Followed by that dreaded moment of switching the power on  … will it work? Well it did! After which the struggle to put the centre console back in place could begin. It’s always a bit of a challenge to keep the wires out of harm’s way while at the same time trying to keep the loom for the radio accessible in the confined space. But after some 15 minutes off careful trial and error (including some swearing) the console assembly was back where it belongs.


Cleaning and putting back the armrest/cubby box and gear lever surround was straightforward and easy after that. As was cleaning, greasing and refitting the gear lever. Even the anti-rattle spring went in at the second attempt. Decided to rotate the gear lever 180° so the anti-rattle spring can try to wear out a new mark in the gearbox extension. Final job of the day was cleaning and reconditioning the leather of the gear lever gaiter and fitting the wooden Nardi gear lever knob.


Sunday 4 August 2019

Fitting new GPS part 3

I left you a few days ago at the point where the dashboard had been removed and the GPS docking station had been fitted to the dashboard. But without the pictures to go with the actual fitting of the docking station. So I’ll start there. As the theory behind the mount and the detailing has been explained in this previous post, I will leave it to some pictures to illustrate how the theory looks in real life …


With this part of the job completed I started at inspecting the car’s wiring in the centre console and fuse box area, in search for a good power take off point for the docking station. But first I had to find a way of removing the radio unit. As I still haven’t found the keys to remove it from its mounting shroud, I went for plan B. I turned the complete centre console assembly onto the transmission tunnel. This way I could easily access the locking tabs in the shroud with some feeler gauges. After which it was easy to remove the radio unit
After that I also cleaned up a few points that didn’t go to plan when I restored the car some 10 years ago. At the time I fitted some additional (green) LED lights to aid finding dropped items on the floor, and have some light in the glove box, in the dark. But for some obscure reasons the co-drivers side never worked. As I didn’t fancy removing the dashboard for that I left it there. But with the dashboard removed I could assess the problem. So I rewired that side and added some extra light to the driver’s side too. The lights are switched through the original A/C switch, as it is a suitable on/off switch that was there already! Added bonus is that it is easily accessible for both driver and co-driver.


And after a few hours of sorting through the wiring it was time to get the main part of the dashboard back in the car. This should be a straight forward job. But in my case some of the non-original wiring usually gets in the way. Or as was the case now a connector came loose. Luckily the dash wasn’t bolted down at that point, so easy but time consuming to rectify. But by the time I had secured the top of the dashboard it was time to call it a day ...