Showing posts with label Exhaust. Show all posts

Sunday, 9 August 2020

FHC resto nr. 98; More parts searching

A few weeks ago I took delivery of a pretty solid FHC front bumper bar. The idea was to have that shot blasted and coated as soon as possible. That is when I found and ordered another TR7 front strut brace in Australia. As these come with silver mounting rings and a black alloy tube, I thought it a good idea to have the steel parts coated (black of course) too. And the steel mounting rings of ‘t Kreng’s strut brace could do with some new coating. Almost 15 years of action on the car have taken their toll on the original silver coating.

So while still waiting for the strut brace to arrive (at the time of writing it’s still waiting for a plane in Sydney), I decided to have another go at searching for missing parts that need coating. First part I went in search of was a left hand boot lid hinge. I had the original ones from the car coated and refurbished them with new pivot points. But while looking at some of the car’s electrics I found that the LH hinge I have fitted to the car doesn’t have a bracket to switch the boot light. So I went in search of a LH hinge that can be used. I found two pairs that could be used.

I wanted to use an early one. The yellow set in the picture above. But as can be seen the actuation bracket for the switch is badly deformed. But I did find the loose later bracket. And better still it had slipped into the box with parts that were galvanised a few years ago! So I decided to use the later hinge. But only the part that bolts to the boot lid. And I managed to repair the exhaust to gearbox bracket. Only need to make a thick load spreading plate to prevent future cracking of the bracket.

Next parts were the front suspension’s top mounts. Found this pretty good set with what looks like the manufacturing identification or control marks (?) still in place. They only have some very light surface corrosion.

I will take them to a friend’s workshop (and blasting cabinet) in the near future, to get rid of the surface rust. After which the steel parts will be coated using some rattle cans. The same treatment is planned for the engine mounts. Found two almost new mounts in my spares collection, though the remaining 7 in the picture below are also fit for future use.

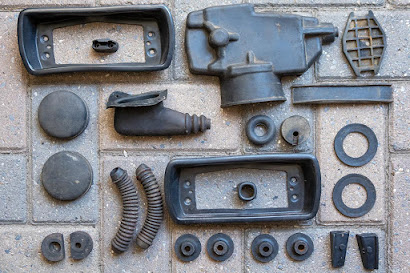
And while rummaging through the boxes with parts I thought it a good idea to sort out all the rubber parts and put them together. This also gave me the opportunity to get rid of some parts that were too far gone to be used in future! A selection of parts that will be re-used on this car.

Most of them only need a good clean before they can be fitted to the car. And I made a start on that already.

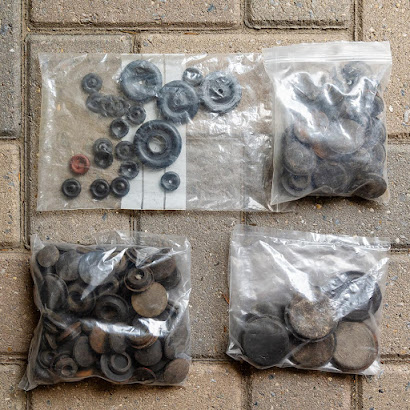
But the main reason I started sorting the rubber parts was to find my remaining stock of new wiring grommets. I bought these while restoring the DHC. And I wanted to know how many new ones I’d need approximately. Well I did find them in the end. Together with a few bags of various used blanking plugs. Clear though that I will have to order some extra ones, as the stock has dwindled a bit. And as soon as they arrive I can switch my attention back to the wiring harnesses!

And a plan is slowly unfolding how to sort and store all my spare parts for future use. Should make life a bit easier!

Sunday, 12 July 2020

FHC resto nr. 97; Front bumper


Went in search of a FHC front bumper yesterday. Those who follow this blog might be slightly puzzled here! And that’s because I had prepared both a front and a rear bumper for the car a few years ago. But I didn’t pay enough attention here and put too much trust in the experts on the social media 😜 So when I found out that my only spare FHC front bumper needed a fair amount of welding, I hoped that using a DHC bumper bar on the ’76 FHC indeed was an easy solution. Well, I have to admit it can be done but you either have to drill new holes in the bumper mounting plates of the car’s body, or you have to cut open the steel armature to change the mounting plate inside the bumper bar. The difference between the two mounting points should be clear from these two pictures:

DHC bumper

FHC bumper
As I didn’t fancy drilling holes in the body, nor cutting up the nicely coated bumper bar to change the mounting plates, I went for an easier option. I visited a friend yesterday, who also has a reasonable stock of TR7 spares. And he did have a few FHC bumper bars to choose from. Turned out one of these also was a DHC bar, despite coming from a FHC. But inspecting that car’s shell, showed they indeed had drilled extra holes to fit the bumper to the car. Luckily the other bumper was a proper FHC bumper. And after removing the side lamps and bumper covers it turned out to be in pretty good condition. No welding needed, just light blasting and coating!


So this will be dropped off for shot blasting hopefully soon. And the DHC bumper I prepared? Well that will be put in storage for when I want (or have) to fit a euro style bumper to my DHC.
And I also found a more or less intact exhaust to gearbox bracket. Though this one also needs a bit of reshaping and some remedial welding to strengthen it, before it can be coated.


Saturday, 30 June 2018

FHC resto nr. 65; Work slowly resumes


After moving all my TR7 parts including the '76 FHC's body earlier in the year, not much has happened to that car. This was mainly caused by work that needed doing to my other cars and sometimes life gets in between! But over the past few weeks I have slowly started to pick up work on the car.
First job that needed doing was find another insulation pad (ZKC3176) for the centre exhaust bracket, mounted to the rear bulkhead. I had one coated but somewhere between shot blasting and moving the parts to their current storage, it got lost. So I had to search for another one in the shed:


This one was sent of to have it shot blasted and powder coated a few weeks ago. And when it returned with a fresh layer of black coating, and I found the exhaust mounting bracket, it was time to add some sound proofing material to its back (as per the original):


And bolt it in place together with the exhaust bracket (YKC957). Always very rewarding work, to mount freshly coated parts to a car under restoration!


Luckily while searching through my parts I stumbled across this little box, containing the black plastic rivets for some of the plastic trim pieces. I knew about its existence but had forgotten where I had stored it!


Which meant that the next item on the to do list was cleaning some of the plastic trim pieces from my parts collection, including the front grill mouldings, the sidelight blanking plates and the sill tread plates:


After which these parts were fitted to the car. Well at least the sill tread plates, the grill mouldings and the front blanking plates. The rear ones will have to wait till the stripping is fitted!


The plans for the rest of the year are first to finish the heater (I ran into a problem there with one of the flaps so that was put aside for a while!) and start on the wiring loom. I also hope to finish fitting the striping and decals to the car together with bending and fitting the brake lines! But first I need to fit the refurbished carburettors to the DHC and see that 't Kreng passes her 
biennial inspection.

Sunday, 22 April 2018

Spring check & clean


With 't Kreng still in use as my daily transport, and a pretty hot weather forecast for last Saturday, I decided to hide from the direct sun underneath the carport, and give the car some well deserved TLC! Over the past few weeks the engine bay did have regular checks, so I switched my attention to the suspension and transmission. For no obvious reason I decided to start at the back of the car. But while positioning the axle stands underneath the ... euhh ... axle, I noticed this rather sorry looking exhaust clamp:


Clearly in need of a replacement! And a fine example of what can happen with galvanic corrosion between two different metals. Luckily I always carry a spare in the boot, so that was quickly sorted. After which I started at the back of the car, with an inspection of the half shaft bearings and the brakes. And as you can see in the picture below it was all rather dirty with road grim and mud to start with:


Luckily all vital parts underneath the dirt were in good condition. And the oil level in the differential casing was also spot on. So the back end only needed a good clean and bit of lubrication on some strategic places. But I also used the opportunity to check all the suspension bolts for tightness. In particular I looked for signs of galvanic corrosion between the high tensile bolts and the stainless steel inserts from the poly bushes. But it looks like the non conductive anti seize compound I applied a few years ago had done its job in that all bolts moved freely after the nuts had been undone a few turns. And all bolts proved still to be pretty tight! For good measure all bolt heads and nuts were covered with a liberal amount of clear wax-oil for protection. As did some seams in the area, that showed signs of cracked paint. Should have used a specific seam sealant when preparing the shell 25 years ago, and not just under body protection 😜


Time to switch to the front of the car. Again a fair amount of dirt in the wheel arches. But underneath again nothing wrong; wheel bearings, brake pads and various dust covers were all in good condition.


And last job for the day was a thorough clean of the wheels. Especially the inside of the front wheels had accumulated a lot of dirt and dust. But nothing an hour's worth of washing and polishing could wipe of. All in all it was a very satisfying day!


Friday, 25 December 2015

FHC resto nr. 44; Small progress


Managed to do a few small jobs on the FHC. First I finished the sound proofing of the body shell by rectifying a few minor blemishes and faults caused by the lowish temperatures when I applied them. This last issue meant a few pads were coming loose at some of their edges or had some air trapped underneath. But with the paint stripper and some blunt tools that was easy to rectify. I also added the last missing pieces on the inside of the sills ...


And for comparison, the same area in a FHC ...


With the soundproofing finished I spent the rest of the afternoon cleaning up all threads of welded in nuts and threaded plates. As it seemed rather inappropriate to cover up the car without any visible proof of an afternoon well spend, I decided it would be nice to fit the first few parts, the seat belts ...


Next steps; refurbish the rear lights and the wiring loom.
But there are some other jobs to do on my TR7's this winter ...

Monday, 29 April 2013

Getting ready for summer

... Or the last major finishing touches for the DHC (hopefully!). There have been several failed attempts over the past 5 months to work on the car, but due to illness (both mine and the workshop's owner), work commitments or just no motivation to work on the cars for various, reasons they were all postponed. But today I at last had a go at changing the clutch assembly, gearbox and prop shaft of the DHC. In preparation for the swap I brought the DHC out of its winter hibernation last Saturday, and the car behaved rather well from an engine and suspension point of view. But the overall experience was spoiled pretty thoroughly by very bad gear-changes in all but 5th gear. Especially changing down a gear after driving at constant speeds for a few minutes was very bad. Needed brute force to get out of gear and into neutral. And when it got out of a gear, it felt as if it was smashed out with a hammer. Not good, but I arrived at a friend's workshop with no problems.

Changing the clutch assembly and gearbox proved to be a pretty straight forward job. Mainly thanks to some proper tools, like a 4-post lift and a rolling hydraulic gearbox/axle stand. And inspecting the parts coming of the car didn't make me any wiser. OK one side of the clutch plate was slightly contaminated with oil but not enough for any big problems. And compared to the "new" 'box, the old one felt pretty loose, but again nothing clearly wrong with it.

So the only thing I could do was put the new 'box on the axle stand and slide it in place, which went rather smoothly. And before long only the exhaust and interior remained. And of course something had to put up a fight. This time it was (again I should say) the tubular exhaust manifold, or more specific the lower rear mounting bolt. This refused point blank to get in its allocated place. After a rather frustrating hour or so I manoeuvred the manifold out of the engine bay to check the threads. Needless to say the bolt slipped in without any problems, and the thread was fine. But it turned out that the thread insert I fitted a few years to the upper rear bolt had somehow got dislodge a bit and as a result it got damaged. With the insert removed we tried again, but the result was the same.
And although the bolts all looked undamaged, in the end the problem was solved with new bolts. After which refitting the rest of the exhaust and the interior took just over 15 minutes ...

As it was well past 5 o'clock by now it was time to pack my gear and head for home. And needless to say it was with some anticipation that I started the engine and drove out of the workshop. Well all the gears are working, and although in the beginning it was a bit notchier compared with a good LT77 'box, after a few miles the gear changes became progressively better, result! Also the clutch feels much better compared to the old one (maybe not so surprising as the old assembly was almost twenty years old), and the car has become much quieter. The only problem so far is that the new 'box has a bit of a rattle with the engine idling and 'box in neutral. But I have to confess that the engine needs a tune up as it idles @ ±500 rpm at the moment (if you can call that idling)

oh ... and I forgot my camera ...

Sunday, 4 September 2011

10CR Preparations Day 2 ...

A fairly early start this morning, as the car’s preparations continued. First thing to tackle were the front brakes. As an inspection some four weeks ago had shown, the pads needed replacing, So that’s what I did. As I haven’t had time to pay a visit to nearby brake specialist C&C Parts, I took the pads from the attic that came with this brake set when I purchased it many years ago from S&S Preparations. Hopefully they are up to the job, will know next week. But more interesting were the pads that came of the car. They definitely were past their prime, showing clear signs of some excessive heat ...


With the pads changed, it was time to check and clean the front suspension ...


And the rear brakes and suspension. Brakes at the rear were fine, but I am a little undecided on the condition of the left hand half shaft bearing. It has a bit of lateral movement, which isn’t to worrying. What worries me more though is the fact that there was a fair amount of grease, which had escaped from the bearing. A discussion point for tomorrow afternoon, when a friend comes over to assist with flushing/bleeding the brakes and clutch.


After lunch I busied myself with a job that wasn’t really necessary from a reliability point of view. But as I had to take of the original starter motor to sort a rattling heat shield, I took the opportunity to change the rather heavy original starter for a modern light weight one ...


On the left 3.5 kg and on the right 7.5 kg! Fitting took slightly longer than planned as I had to adapt the wiring a little to get a proper fit. But the end result looks rather nice, with much more clearance from the exhaust on all sides ...


While in the Alps earlier this summer, I found that the temperature was wandering up and down more than what I am used to with my TR7's. Having checked various possible problem areas, in the end I decided it was time to fit a new viscous coupling. Turned out that the old unit had a fair amount of play on the centre part. Also there was hardly any resistance left in the old unit, irrelevant of temperature or revs. So probably all fluid has escaped from the unit!

Removing the viscous coupling from the pulley assembly wasn’t too difficult using the proper tools. I did support the assembly under the viscous coupling. And with a small outer diameter socket on the pulley shaft it could be tapped out. As the coupling was shot already I didn’t worry too much about damaging it!


When refitting the coupling I supported it under the rotating part of the pulley assembly. And gently tapping it in position using a correct (outer) diameter socket on the couplings inner ring and using a new tolerance ring of course (please note the clearly visible old and flattened tolerance ring in the picture above!).


Turning the viscous coupling showed that the new item has much more resistance compared to the old one, so hopefully problem solved. With the new coupling fitted to the pulley, I thought it a good idea to clean the fan a bit, as it had collected quite a lot of dirt over the past year. But it had also acquired something else, a few cracks ...


As I don’t like the idea of fan blades attacking my bonnet I picked another one without cracks ...


So remain the following items on the to do list before this Thursday;
• Second opinion on LH rear bearing;
• Change brake and clutch fluid;
• Sort dashboard lights;
• Finish general check over.

Monday, 8 August 2011

Changing gearbox

During my recent trip to the Alps the gearbox in the DHC developed some nasty noises. Especially when in neutral and/or hot it rattled away quite happily, indicating something with the bearings wasn’t as it should be. As the car will be used for Club Triumphs 10 Countries Run in a month’s time, a gear box swap seemed like a good idea. And while going through my spare parts in search of a better ‘box, I remembered that when I prepared the car for the 2007 edition of the 10CR I made a mental note to swap the gearbox in the not too distant future. Clearly forgot that when I restored the car ! And I found a reasonable box to use. As it hasn’t done more than 100.000 kilometres and has no noticeable play on the input shaft it should be OK.
So last Friday evening I parked the car in the workshop and started the preparations for the gearbox swap. This meant removal of the prop shaft, exhaust system, starter motor and clutch slave cylinder, and disconnecting the speedo cable ...


Also drained the oil from the ”old” gearbox. I had expected some grindings in the oil or on the drain plug, but there was absolutely none.

And on Saturday I returned with some extra hands to take the ‘box from the car, which went very smoothly. But the removal of the heat shield from the starter motor should have been a warning, it just didn’t want to come of the starter motor ...


With the old ‘box from the car it was time to inspect it. And indeed the input shaft had a fair amount of play. So we carried on and swapped the gear change extension over to the “new” box ...


and clutch release mechanism. I had a few reservations about fitting the last one, as it can sometimes be a real pain to put it back inside the bell housing. But I needn’t have worried it slipped in quite nicely at the first attempt ...


After that it was just a matter of putting the gearbox back under the car. But we needed three attempts before the gearbox slipped in place. Seems like they get heavier every year!
After lunch we returned to the car to bolt everything back in place. All went pretty smooth till we reached the exhaust, the manifold slipped in place quite nicely, only had to remove the strut brace for that. But when fitting the bolts Murphy paid us a visit. The least accessible one (lower rear) refused point blank to go in. Took me a very frustrating half hour to get it in place.


After that the rest of the exhaust system and the prop shaft went in without a problem. I should have gone home at that stage but I promised Robbie that I only needed his workshop for one day. On the other hand I only had the gear lever to put back. Sadly Murphy hadn’t gone home, so the lever, or more precise the anti rattle spring inside it put up quite a fight. But half an hour and lots of swearing later it slipped in as it should. Time to put the car back in the shed and head for home and enjoy a well deserved beer. Driving the very short stretch from the workshop to the shed revealed that the gear change was rather crappy, much worse than the old box. But at that moment I couldn’t care much!

So on Sunday I took ‘t Kreng for a short spin just for fun, after which she swapped places in the shed with the DHC. When setting of in the DHC the gear change indeed wasn’t very good, but not as bad as it had seemed the previous day. What should you expect from a box that has been lying in the corner of a shed for 5 years? And while driving along it gradually improved. Still not brilliant, but at least as good as the old ‘box, and with better bearings, so it should be OK for the 10CR. Plan is to drive the car as much as possible in the next few weeks to flush the box and renew the oil shortly before the 10CR. See how it all develops.