Friday 25 December 2020

Parts donor part 4

The disassembly of the parts donor is going pretty well. Mainly because I was able to spent a few hours in the shed in the days before Christmas.


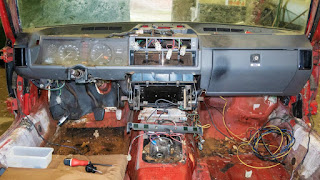
I started with the dashboard assembly. As most of the interior had been removed already, this was pretty easy. And here I started with the instrument upper roll. Which is obvious of course. All screws came off without any drama, as did the roll itself.


Next in line was the instrument panel. Here I first removed all the screws holding it place, so it could be pulled up a bit to gain better access to all connectors at the back. And with everything disconnected, the instrument panel could be retrieved from the car.


After which removal of the facia was very straight forward indeed. 
At this stage it started to become clear that the main wiring harness is in pretty good condition. So far the only adaptation I found was one “fire starter”, or Scotchlok connector as they are also known. Though the amount of added wires I collected in the passenger foot well might suggest something different!

Final task for the interior was the removal of all the remaining wiring. But for that I also had to disconnect a few wires in the engine bay. Here I encountered a completely new problem. There were so many leaves in there that it was impossible to find most of the connectors. Luckily I had a large vacuum cleaner at hand. After all the leaves and small branches were removed, I was able to access all the wiring connectors in the engine bay and disconnect them. Followed by the same action for the nose of the car:


With that sorted I was able to gently pull back the wiring harness into the cars cabin:


And from there remove it entirely from the car. I might well change my plans for the ’76 car now. As a quick superficial inspection shows that this harness might be in very good condition indeed!


Then, at the end of one of the afternoons, and for no apparent reason, I decided to have go at removing the front windscreen surround trim. I started with the left hand side, working from the lower corner upwards. Using the blue plastic tool together with the red handled chisel (pictured below) I managed to get a foothold on the lower section. From there I slowly worked upwards, using the plastic tool between screen and trim and the chisel between trim and screen surround. But getting up towards the top corner the progress halted. So I switch to the section above the centre of the windscreen. And after about 15 minutes of carefully levering at the trim surround, it came off.
Next I tackled the right hand side. And with the (re)gained experience, that came of within minutes. But while working on that surround trim part, I noticed that the whole screen was moving slightly. Lifting it gently from the right hand side, showed that it was only held in place on the left hand side wind screen pillar. And after some gentle persuasion that side came free of the wind screen surround too. An unexpected quick and easy result! Glad I can add another front screen to my stock of spare front screens, as with current drivers attitudes they are easily damaged!


Also managed to drain the fuel tank, cooling system and brakes. And disconnect the engine completely and remove the radiator. Only the exhaust is still in place and connected to the engine.


Remains a short study of the amount of tin worm that this car’s body houses. Or damage (rust) assessment so far!

The inside of the driver’s side, of the lower wind screen surround.
No visible rust on the outside of the wind screen surround though, which is good!

Cosy mouse nest hidden behind the blanking plate for the wiper mechanism.
But after vacuuming the area it turned out to be in fairly good condition,
be it with a large amount of heavy surface rust;

The area with the most rust of the car. The sill at the front isn’t too bad though.
And it is clear to see that repairs have been carried out before.

A close up of the rot in the driver’s foot well floor.
After poking around with the handle of a screw driver

The passenger foot well is solid. Though on this side there is also a repair panel welded in.
Hopefully it was done properly as the battery tray is on the other side!

Final tasks, before passing it on, will be the removal of the gearbox and back axle. They are low mileage according to the odometer, as it reads only 87173 kilometres. And the seats didn't look too worn! So the mileage seems to be correct.

Monday 21 December 2020

Calendar Girls 2021

The cover:
Showing my current cars

As it's almost time to say goodbye to 2020, it is also time to compile my traditional calendar for next year. Sadly, due to the Covid-19 pandemic, I was hardly able to use both my road legal TR7’s for what they are intended for: Driving! And all planned trips and tours had to be cancelled. So not much kilometres were added to my TR7’s odometers in 2020. In total I covered only 1360 kilometres in my TR7’s, of which 434 kilometres were covered with ‘t Kreng and 926 kilometres with the DHC. So from a driving point of view, 2020 is also a year that should be forgotten as quickly as possible! At least with regards to my Triumphs. Contrary to the TR7’s, my Little Landy saw a fair amount of extra kilometres due to the Covid-crises. Having a “crucial job”, not being permitted into the office, and with various projects in progress, added a few extra kilometres to the LaRo’s odometer!


But these pictures didn’t make it to the calendar for 2021. And the few trips with the TR7’s didn’t supply enough pictures for my 2021 calendar either. Luckily I was able to spend some quality time on my current restoration project, the ’76 car. Resulting in a calendar which is a mix of a few touring pictures of the DHC and ‘t Kreng, supplemented with some pictures showing some of the work done on the ’76 car in 2020. Hopefully 2020 will be a better driving year!

January:
The interior of the ’76 car slowly taking shape

February:
The finished back end of the ’76 car,
leaving no doubt what engine will be fitted

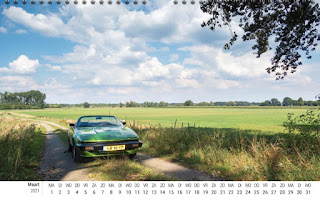
March:
One of the very few tours of the year (and Covid-19 proof)
Near the Bergerweg in Vlodrop (NL)

April:
Earlier in the year I managed to lay my hands
on a factory fresh Sprint engine for the ’76 car

May:
Fitting the striping to the ’76 car

June:
Returning from the DHC’s biennial MOT

July:
The ’76 car’s exterior slowly taking shape

August:
Third and final tour with ‘t Kreng,
Dubbroek Maasbree (NL)

September:
One of the very few tours of the year (and Covid-19 proof),
Bergerweg in Vlodrop (NL)

October:
The engine bay of ‘t Kreng,
still looking fairly fresh 25 years after it was built

November:
Detail of ‘t Kreng’s upper strut mount and refurbished strut brace

December:
Third and final tour with ‘t Kreng, Dubbroek Maasbree (NL)

Sunday 20 December 2020

FHC resto nr. 118; Striping finished

At the start of my Christmas holidays, I decided to transfer most of my tools to the shed, and spent a Saturday afternoon there. And with the temperatures well above 10°C I thought it a good idea to finish the ’76 car’s striping and decals. Even the Sun came out for a brief spell!


With everything prepared and ready (including water cooker and hairdryer) I decided to start with completing the driver’s side. This meant applying the striping to the left hand front wing and replacing the TR7 decal underneath the blanking plate. Which shouldn’t be too difficult, and as such ideal as a warm-up. In the end the only slightly difficult part was folding the striping over the rear of the front wing. And that was due to limited access to the area. But I managed to get some warm air and my little finger between the wing panel and door to press the foil firmly in place.


Next was the rather 70’s style “TR7” decal I had applied a few months ago. I didn’t like the look of it, mainly because the font style clashed with the SPRINT cut-out in the door stripes. So the “original” decal was removed and replaced with a slightly down sized Speke nose decal. I have to admit that this looks much better.


After this warm-up exercise came the most important and difficult part for the day: The striping for the right hand rear wing. As with my previous attempt I needed to reposition this part a few times to get the correct position. But this time it was successful.


After which the application foil could be gently removed. And due the length of the part tricky. Especially for the two narrow side stripes, which have a tendency to stretch a bit when removing the application foil.


Although not 100% perfect. There is a tiny fault in the upper side stripe. And the alignment to the back of the door could be better. Though this is fault is exaggerated by the fact that the door sits a little to the inside. And that is because the seals are not in place yet. But overall I am well pleased with the end result.


The final part to apply was the “TR7” nose decal. For its position I used an instruction leaflet I found on the internet, forgot when and where. And at the time I stored a digital copy on my computer. Just in case! And after 15 minutes of positioning scraps of masking tape, careful measurements and placing markers, I had produced this seemingly random pattern. Which enabled me to put the nose decal in position. The cross hairs (just visible on this decal in the second picture in this post) were used to align it correctly between the markers.


As there still was a little daylight left, I decided to carry a few smaller jobs on the cars. The first being fitting the bulbs to the front side lights. As with my other two TR7’s I opted for standard spec bulbs, which were pulled from my the spares stock.
When I restored ‘t Kreng almost 25 years ago I thought it a good idea to buy a selection of various smaller bulbs. Thinking I would have to replace them every so often. Well, so far all the bulbs fitted to ‘t Kreng are still functioning as they should. So I have a few spares left.

The final job for the day was fitting the hand brake lever I prepared well over two years ago. But first the rubber dust cover needed some attention. It has a little tear at the nose, where the cable connects. Apart from that it is in good condition, and will probably outlast any cover sold these days. The cable tie is there to remind me of a small tear at the nose of the bellows of the cover. When the hand brake cable is fitted I’ll tighten the cable tie over this tear to prevent it from getting longer. Fitting the actual hand brake lever was the proverbial piece of cake.


Edited 24-12-2020: I found out something went wrong with the screen calibration while developing the digital negatives. As a result of which the colour of the pictures was to yellow. This is now rectified. And in the process I added a few pictures which, with the correct colour, turned out much better.