Showing posts with label Water pump. Show all posts

Tuesday, 30 December 2025

My TR7’s in 2025


One final look back on 2025 from a TR7 point of view, before 2026 is well and truly upon us. Starting with the repairs of the DHC’s body. Below are a few shots of the work done so far. More in the relevant blogposts;

Early in the year the original body shell of that car saw the light of day again,
after many years of storage in the shed.
Ready for the next chapter in this car’s life and a new beginning!


After paint removal and shot blasting.


The repairs of the right hand sill and rear wing edge.


Rear of the right hand cabin floor section.

Left hand sill repairs.

Rear right hand suspension pick up points.

Next car in line for some attention was the 1976 TR7. Actually looking back not much work was done to this car (proof HERE!). But there has been some progress. Starting with a few small interior jobs.

Refurbishing and fitting the early style roof mounted interior light.

Fitting the gear-lever-gaiter-finisher to the gear-lever-gaiter.
It wasn’t as straight forward as it looks because I wanted the top of the
gear-lever-gaiter to be folded inside by a few millimetres to give a nicer finish.


Reassembling and mounting the steering column.
Always nice putting nice shining parts back on a car!

Than there was the business off redoing the gearbox extension 
because
my first attempt turned out not to be thorough enough. I think it is now.

And swapping the mounting hardware for the brake
balance pressure reducing valve for some nicer items.

Later in the year I had a go at fitting the ill-fitting but very nicely refurbished repro parcel shelf to the car. Needed an extra pair of hands to complete this job. But well worth the effort. And with the parcel shelf in place the boot trim could be finished:


But most of my Triumph time was spent on ‘t Kreng. Starting with another water pump replacement earlier in the year, after which the car was used as much as possible.


So far this pump has been pretty fine, with only a few very tiny leaks from time. But that is nothing to worry too much about with a graphite drag seal. These can always leak a tiny bit. So the most worrying bit is the lack of time to use the car on a regular basis. And thus preventing oxidation starting on the water pumps sealing surface. Which in turn can start another leak. But I did my best, covering exactly 2750 kilometres since fitting the new pump in the second half of April 2025. With the last drive just over a week ago:


End I reached an important milestone with this car. The car's odometer is around the clock for the second time in its life! Sadly at the moment the roads are covered in rock salt to prevent icing. So the next drive will be “somewhere” in 2026!


Monday, 9 June 2025

‘t Kreng’s water pump

p.s. the damage to the spark plug caps was caused many years ago by a stone marten.
He/she was handled properly without any animals being harmed in the process!

The last time I reported on this subject there still was a small leak from the slot underneath the water pump. But it looked like it was starting to seal better after each drive. There was no noticeable drop in the coolant level every time I returned home. Though there would always be a tiny trace of coolant from the slot underneath the water pump. At least the driving always was nice!


On the driveway to the former fiefdom “Jongenhof” near Lerop - St. Odiliënberg.
A for the Euregio typical large carré farmhouse and former seat for a feudal lord.

Today I took the car for a 2½ hour drive, but not before I wiped of all traces of coolant from the slot. During this drive the temperature gauge remained rock steady at its normal position, with the needle just touching the ½ mark. The coolant light only lit up briefly when starting the car. And when I returned home late in the afternoon, there again was the mandatory check for any leaks. The slot and the area underneath were completely free of coolant traces. Success at last I hope. Time will tell!


Sunday, 20 April 2025

Fitting ‘t Kreng’s water pump


Two weeks ago I removed the water pump with the idea of reconditioning it again. But on closer inspection I found the new (after market) seal hadn't seated properly. This matched my hunch pretty well. So after exchanging some ideas with various people who should have knowledge on the subject, I decided to bite the bullet and go for a brand new water pump. And as these have become fairly expensive, I decided to also renew the water pump’s spindle bush. And with the correct tool, removing this bush should have been easy.


Sadly though that didn’t work. The available rim at the bottom of the bush was to thin the get enough grip on the bush, as a result the puller slipped through the bush constantly. And because of that the bush got damaged. As there was no way back it was time for a rethink and some appropriate brute force. Using an old reshaped screw driver as a cold chisel between the engine block and bush. It looked fairly crude and messy but it did the job without any damage to the block or the jack shaft. The bush did suffer though!


The remains of the original bush (#145022)

Halfway through the cleaning of the orifice for the spindle bush

After the bush was successfully removed and everything cleaned thoroughly it was time to fit the new bush. And with the aid of a small tool made from a damaged water pump axle and some lubrication, the bush could be gently tapped into position. At least that went quickly and without drama!


This also applied for the next job, fitting the water pump. Again all contact surfaces in the block and on the gears were lubricated. After which the pump slipped in without drama. I only had to help a little with a ring spanner on the impeller bolt (turned counter clockwise) to get the pump seated correctly.


Final jobs before the time ran out on Easter Sunday were measuring the required gasket thickness for the water pump cover, fit the cover and fit the inlet manifold. When I fitted the inlet manifold last year it felt like the threads of one of the mounting holes in the head was damaged. That's why I had mentally prepared myself for this job, and had a thread repair kit on hand. But I needn’t have worried. This time all (stainless) bolts went in without any problems!

Remain the final jobs for later in the coming week;
• Connect all hoses;
• Fill the system with coolant;
• Check for leaks;
• Refit the carburettors.


Sunday, 6 April 2025

‘t Kreng’s water pump

Or the never-ending story continues! The last few times I drove this car last year, there remained a noticeable coolant loss. And unfortunately the leakage did not diminish, it started to get slightly worse. So I decided to bite the bullet and remove the water pump to check the condition of all the seals. Time to get the spanners out again!


The biggest advantage of working on a water pump that was fitted not so long ago is that everything comes of very easily. Even the pump itself could be removed simply with a ring spanner, turning the pump clock wise. Which meant that within an hour and a half the water pump was out again.


And with the pump out it was time for a first superficial inspection. I had hoped something obvious was wrong but there wasn’t. So somewhere in the coming week I’ll have to visit a friend’s work shop to use his hydraulic press to remove the impeller and check all parts in more detail. To be continued!


Sunday, 14 July 2024

Finishing ‘t Kreng’s water pump: take 3

It’s been a while since my last post. Not that I have been idle, but because ‘t Kreng’s cooling system has been putting up quite a fight. I left this job with “only the coolant hoses and the carburettors left to be fitted. Glad I only fitted the coolant hoses and then started filling up the coolant system. Sadly by the time the coolant level reached the infamous connecting tube UKC2538 the coolant started to leak out, not good. Time to call it a day and have a few beers!
After visiting the shed a few days later to collect my trolley jack I found back some motivation to carry on with the job! The sooner ‘t Kreng is back on the road the sooner I can continue work on the ’76 car!


And when I got home the inlet manifold was removed. But on closer inspection I couldn’t find anything wrong, though there had been a little lack of resistance when pushing the manifold onto the connecting tube. Time to order some new O-rings in the correct diameter just to be sure, taking the necessary measurements from the various parts. And more waiting for parts to arrive.
In the end the O-rings arrived after two and a half weeks! And they indeed were slightly larger compared to the ones supplied some time ago from a UK based parts supplier. Time for the second attempt to fit the inlet manifold. This time there was a noticeable increase in resistance while mating the manifold to the connecting tube. But again no success! While pouring coolant into the system through the thermostat cover a leak sprang from the connecting tube as soon as the level got above the top of it. Some expletives were uttered! At least the water pump itself was still leak free.


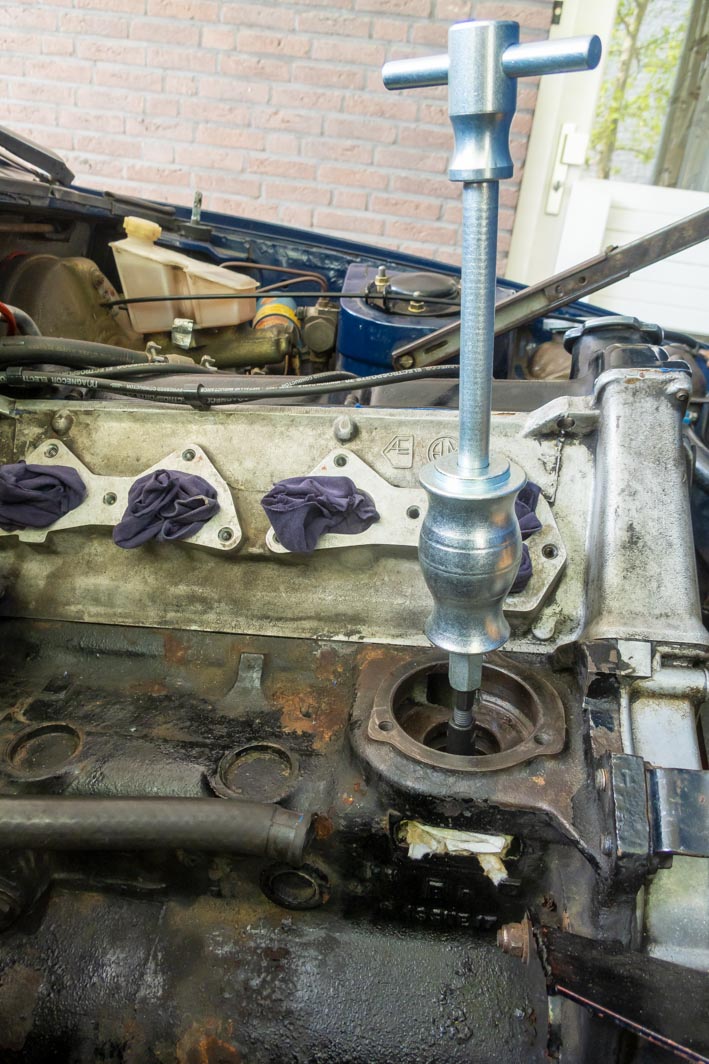
And time to remove the inlet manifold again. This time the cause for the leak was rather obvious. The upper O-ring had caught the edge of the manifold opening and got partially dislodged. Time for take three. But first I had to order a new manifold gasket as the “old” one got damaged while removing the manifold.


Sadly I was again let down by a supplier or courier. The gasket should have arrived on Saturday morning at the latest. It didn’t. As the car is booked for its biennial MOT this Wednesday I couldn’t wait much longer. Luckily I stumbled upon a long forgotten stock of gasket paper with different thicknesses, hidden in the attic. So I had a go at making my own gasket. Using the old item plus the inlet manifold as templates. Fairly straight forward, but time consuming. And as it was late in the afternoon by now I decided to call it a day. Oh and I forgot the pictures of the finished product.
So this morning I had a fairly early start for my third attempt. I have to admit that I had used some of the time while waiting for parts to arrive to work out a plan to fit the manifold. In the end I decided it would be better to put the connecting tube into the manifold before adding the manifold to the engine, using telephone pliers to keep the tube as low as possible in the manifold while adding the lower part of the tube into the water pump cover.
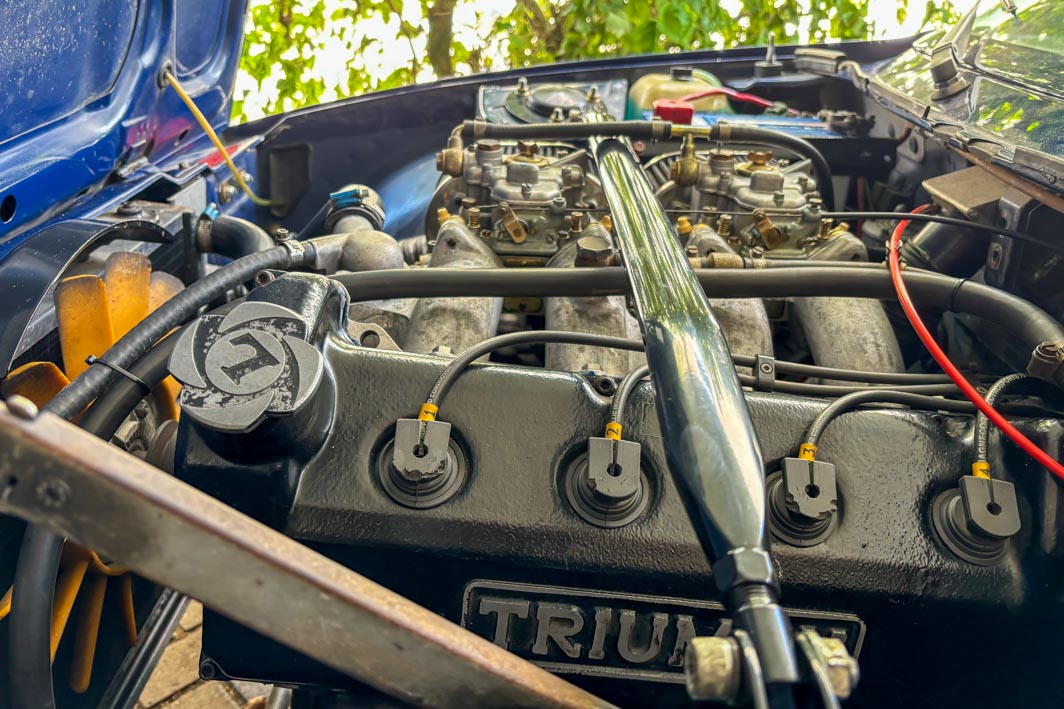
And with the manifold and home-made gasket roughly in place I could again start fitting the stainless bolts. These were chosen to reduce galvanic corrosion between steel bolts and alloy engine parts.


Everything seemed to go well, but when adding the second to last mounting bolt, it didn’t want to go in properly. I managed to get it in by hand in the end but it felt as if the thread in the head is on the way out. So I was rather careful to (over)tighten it. Next time the manifold comes of said bolt hole will probably need a thread repair.


And with all bolts tightened up it was time for the dreaded final task. Filling up the system with coolant. I again decided to fill it through the thermostat cover. But when the thermostat house was starting to fill up there was the dreaded sound of escaping coolant. Luckily it turned out to be coming from the coolant hose that runs between the thermostat and the radiator. This was still fitted to the radiator, but the other end was resting on the water pump cover. And after cleaning of the coolant I could conclude that the tube seemed to be waterproof. Result!


Left me with the rather relaxing job of refitting all hoses, the carburettors and the strut brace. But not before these were treated to a good clean.


Final job for tomorrow evening will be topping up the coolant level and hopefully a test drive to see if everything still works as it should.


Update 15-07-2024: Tonight I first checked the coolant system for leaks (there were none) and topped up the coolant level. And after expelling any trapped air and checking the fuel lines for leaks under pressure, it was time for the final test, starting the engine. It started promptly after which I let it run till the temperature gauge reached the ¼ mark. And after that there was the much dreaded final inspection for any leaks. So far everything is dry. A test drive is scheduled for tomorrow evening, and MOT on Wednesday. And hopefully time to enjoy the car afterwards!