Sunday 29 May 2022

Spark plugs


As part of the pre MOT service I decided to change the spark plugs on both my road going TR7’s. To start with the plugs from ‘t Kreng. The Sprint powered car. These plugs have been in the engine since September 2014, covering 10.509 kilometres since.


They don’t look to bad, but I think the fact that cylinder #1 is slightly down on compression shows here. A check of the valve clearances might also be a good move!


While working on this car I did another check of the connecting tube (UKC2538) between inlet manifold and water pump cover. After the previous inspection I had cleaned and dried the area. And guess what, it was completely dry this time! So for the time being no action required!


Next it was time to change (and check) the DHC’s spark plugs. These were also fitted in 2014. But they have covered 20.220 kilometres since.


Again not much wrong , though I wonder while the plugs #2 and #3 are slightly wet with fuel. Rather weird as the engine hasn’t turned since September last year. Also clear that there is a light oil deposit on plug #3. Maybe a proper tune up (valve clearances and timing check ) will improve things here. But first I think the car needs to be used more!

Sunday 22 May 2022

Servicing ‘t Kreng


Over the past week or so I managed to spent some time on ‘t Kreng. Main job was a pre MOT check and a service, starting with the dry bits at the back of the car. No real horrors there. All the back axle needed was a clean and some grease on the hand brake mechanism. It was so uneventful that I even forgot the pictures!
A problem I didn’t have with the next job, cleaning and lubricating the Weber’s throttle mechanism. As this is mounted underneath the rear carburettor it is almost completely hidden from view. Which makes removal a bit of a trial and error job. Unless you use the modern equivalent to the inspection mirror: the smartphone’s camera.


And this clearly showed that it’d be best to remove the complete air filter assembly plus inlet trumpets from the rear carburettor. It also showed that it would be best to leave the mechanism’s mounting plate attached to the bottom of the carburettor.


Removal of the mechanism revealed no hidden horrors, though the lever arms pivot axle did show light wear marks. But that should be good for a fair few years of service. Also used the opportunity to remove some slack from the throttle cable
And of course with any check of a TR7 engine bay, a close look at the water pump area is high on the to do list. The outcome was as expected. The infamous hole underneath the water pump was completely dry.


As can be seen in the picture above there (still or again) is a small leak from the connecting tube (UKC2538) between inlet manifold and water pump cover. I have been trying to ignore this leak for well over 5 years now and it has often solved itself after some use of the car. Will see how it develops over the coming weeks or months!


Next job for this part of the car’s service was an inspection of the front bearings and brakes. Starting with the bearings. Turned out the left hand front bearing needed a tiny amount of adjustment. As there was no discernible noise, I just tightened the nut a little.


Final job was a good clean of the inside of the wheel arches. It always amazes me how much dirt and soil can be collected here. Especially on top of the brilliantly (not!) placed L-shaped profiles between the inner wings and the strut towers.


Thursday 12 May 2022

FHC resto nr. 141; Inspecting engine harness

If I want to get the ’76 car back on the road before its scheduled date I really need to spend some more time on it. And where better to continue the work where I left off. The wiring that is.
Having a few spare hours over the weekend I decided to start with another piece of the car’s wiring. The engine harness. In this case again a non-original item from a late Solihull car (part number RKC5511). And as almost standard with this harness, it looked quite sorry at first glance. Quite logical bearing in mind were it is fitted around the engine!


As with the rest of the wiring I started with capturing the original state of the harness. The emphasis obviously on the various connectors and the order of their connecting wires. To start with the two main connector plugs that connect the engine harness into the main harness;


The gear box harness connector:

The alternator connector:

The starter motor connectors:

And finally the various single connectors:
Clock wise from top left;
Connector distributor feed (WS);
Connector oil pressure switch (WN);
Battery to alternator (N);
Connector coolant temperature sensor (GU);

Next stage was removing the (in some places badly damaged) wrapping tape. A first superficial inspection of the wires revealed no real hidden horrors.


Though this bit of wrapping tape made me wonder what was hiding underneath, as I couldn’t remember any spliced wires or connections in this area of this harness.


Removing the tape revealed absolutely nothing! At least my memory isn’t as bad as I thought, but still not a clue why this amount of tape was where it was. Maybe they forgot to put the bulkhead grommet on before fitting the connectors?


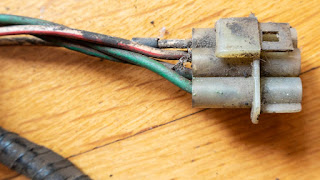
And to end this post a picture to illustrate why it's always a good idea to pay some extra attention to the various wiring harnesses!

Hopefully to be continued soon …