Sunday 23 August 2020

FHC resto nr. 100; A jubilee post

On the 19th of October 2013 I became the owner 03-NF-52, a fairly early Dutch TR7. The car was first registered on the 6th of October 1976. At the time I didn’t really want to buy another TR7, but the car was fitted with my favourite alloy wheels for a TR7. And the price was right. So I bought a slightly over priced set of Wolfrace Turbo wheels with a car attached to them 😳. And as soon as the car was in the shed the wheels were removed, refurbished, and fitted to my DHC.

Initial plan was to get rid of the car and make a small profit! But my longing for an early car (with a few twists) was stronger. New plans were made, and on Wednesday the 15th of January 2014 I started with the first stage of the restoration, dismantling the car. My initial time schedule was to have the car ready by the time it would be tax exempt in October 2016. But that schedule has since been abandoned!

And this weekend I reached the ninety-ninth blog post on the restoration of this TR7. Time to celebrate this fact with a jubilee post! So for the hundredth post I will bore you with a picture post. Looking back at the work done, using my favourite pictures and parts of the project so far.

2013-10-20: Patiently waiting for the things to come.
In the shed alongside ‘t Kreng.

2014-02-12: Dismantling completed.

2014-03-15: A photographic experiment with the bare seat frames.
Shortly before they were sent off for blasting and coating.

2014-03-15: Rear suspension parts ready,
which was fairly easy as I had already prepared them as spares!

2014-03-30: 14” Moto Lita Mark Four steering wheel with a custom design billet centre cap, using an original late TR7 steering wheel’s centre badge

2014-05-24: Rectifying the butchered boot floor
and the incorrect late-small-filler-cap-rear-deck.

2014-06-25: Creating access for various relative small repair sections

2014-07-10: Welding completed and waiting for final shot blasting,
and application of a base coat primer

2014-07-30: Collected the seats (and other interior trim parts) from a local car trimmer. The Tartan cloth was ordered (after much mail traffic) from House of Tartan, with the pattern being based on the Menzies Clan’s black & red tartan. And this pattern was  adapted slightly to my personal taste.

2014-07-30: As the original parcel shelf was beyond repair, I ordered a GRP replica.
But it’s finish was so bad that I had it recovered too. And I have to admit it looks brilliant!

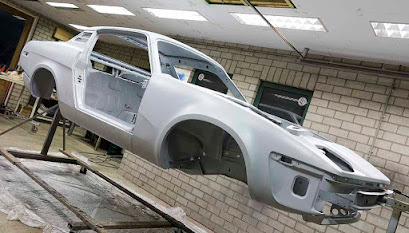
2014-08-25: The car was moved for the next stage: paint preparations.

2014-11-08: Paint preparations slowly taking shape.

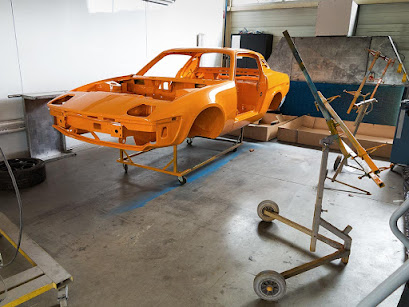
2015-02-05: The first visit to the painters. The interior, the engine bay and the underside painted in “Nearly-Topaz-Orange”.

2015-06-13: The body, doors, boot lid and bonnet are ready for painting.

2015-09-07: Painted in its chosen colour at last, and waiting for the satin black paint to be applied to the sills and the rear light panel.

2015-09-14: Painting completed and temporary back in the shed.

2016-01-14: One of the little projects that got out of hand time wise.
Re-manufacturing the body tags (with a twist) and the VIN plate.

2017-05-25: Inspecting the inside of the fuel tank after powder coating the exterior,
but prior to preparing and coating the inside.

2017-05-30: The back of the car slowly taking shape.

2014-12-20: Lots of smaller parts after sand blasting.

2018-01-04: And some of these parts after zinc plating and (black) passivating.

2018-03-31: A sad farewell. Clearing the shed at René’s place after he passed away.

2018-06-30: Slowly picking up work on the car again …

2018-09-14: The finished headlamp supports.

2018-11-03: Fitting the bonnet stay with my daily driver patiently waiting outside the shed.

2019-01-06: Refurbished parts for the boot lid lock mechanism.

2019-03-23: The interior slowly taking shape after fitting the reconditioned heater unit.

2019-09-23: Fitting the striping to the doors.

2019-12-08: Refurbishing the door handles finished.

2019-12-27: Fitting the door lock mechanism and VIN plate
(for the anoraks, I turned it through 180°)

2020-02-29: Fitting a few exterior trim parts.

Saturday 22 August 2020

FHC resto nr. 99; Small steps at a time

In my previous post I selected a few parts for future blasting and painting. As a result of which I booked some time at a friend’s workshop and his blasting cabinet this Saturday. But I had a bit of a false start here, caused by moisture absorbing pellets that had found their way in the blasting media (glass beads). And they were too large to pass through the nozzle, causing frequent blockages. But after cleaning the blasting nozzle and sifting the blasting beads, the cabinet was back in full working order. And half an hour later the parts (engine mounts and front suspension top mounts) were cleaned of any rust.

Next the parts were cleaned and de-greased,
after which they first got a base coat of a grey primer.

This was followed by a few layers of satin black top coat after the base coat had dried enough. A few hours well spent!


Sunday 9 August 2020

FHC resto nr. 98; More parts searching

A few weeks ago I took delivery of a pretty solid FHC front bumper bar. The idea was to have that shot blasted and coated as soon as possible. That is when I found and ordered another TR7 front strut brace in Australia. As these come with silver mounting rings and a black alloy tube, I thought it a good idea to have the steel parts coated (black of course) too. And the steel mounting rings of ‘t Kreng’s strut brace could do with some new coating. Almost 15 years of action on the car have taken their toll on the original silver coating.

So while still waiting for the strut brace to arrive (at the time of writing it’s still waiting for a plane in Sydney), I decided to have another go at searching for missing parts that need coating. First part I went in search of was a left hand boot lid hinge. I had the original ones from the car coated and refurbished them with new pivot points. But while looking at some of the car’s electrics I found that the LH hinge I have fitted to the car doesn’t have a bracket to switch the boot light. So I went in search of a LH hinge that can be used. I found two pairs that could be used.

I wanted to use an early one. The yellow set in the picture above. But as can be seen the actuation bracket for the switch is badly deformed. But I did find the loose later bracket. And better still it had slipped into the box with parts that were galvanised a few years ago! So I decided to use the later hinge. But only the part that bolts to the boot lid. And I managed to repair the exhaust to gearbox bracket. Only need to make a thick load spreading plate to prevent future cracking of the bracket.

Next parts were the front suspension’s top mounts. Found this pretty good set with what looks like the manufacturing identification or control marks (?) still in place. They only have some very light surface corrosion.

I will take them to a friend’s workshop (and blasting cabinet) in the near future, to get rid of the surface rust. After which the steel parts will be coated using some rattle cans. The same treatment is planned for the engine mounts. Found two almost new mounts in my spares collection, though the remaining 7 in the picture below are also fit for future use.

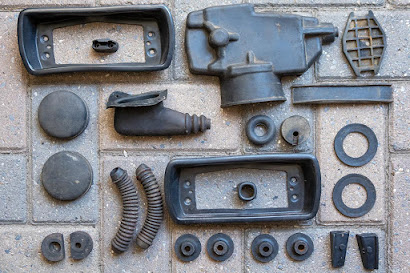
And while rummaging through the boxes with parts I thought it a good idea to sort out all the rubber parts and put them together. This also gave me the opportunity to get rid of some parts that were too far gone to be used in future! A selection of parts that will be re-used on this car.

Most of them only need a good clean before they can be fitted to the car. And I made a start on that already.

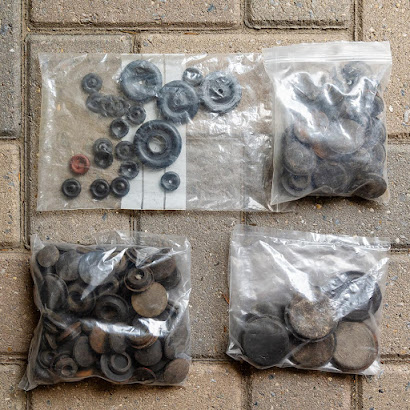
But the main reason I started sorting the rubber parts was to find my remaining stock of new wiring grommets. I bought these while restoring the DHC. And I wanted to know how many new ones I’d need approximately. Well I did find them in the end. Together with a few bags of various used blanking plugs. Clear though that I will have to order some extra ones, as the stock has dwindled a bit. And as soon as they arrive I can switch my attention back to the wiring harnesses!

And a plan is slowly unfolding how to sort and store all my spare parts for future use. Should make life a bit easier!