Showing posts with label Clutch. Show all posts

Sunday, 17 August 2025

More TLC for ‘t Kreng


Part two of the general service and maintenance check of ‘t Kreng, which was carried out over this weekend. With the most important job being flushing and bleeding the hydraulic fluids. From a mileage point of view this wasn’t really necessary. But both clutch and brake fluid were well over three years old. Where my normal interval for these fluids is two years. So time to call on the help of a friend for a traditional flushing and bleeding session!
Starting with emptying and cleaning the clutch cylinder’s reservoir. And this immediately showed why regular hydraulic fluid changes are absolutely essential. The fluid I sucked out of the clutch cylinder’s reservoir was almost completely black. Forgot to take the picture but the one in this earlier post gives a good indication on how it looked! After that the reservoir was cleaned and filled was fresh brake fluid (Bosch DOT4). Flushing and bleeding the clutch system was left till later though.


We moved to the brake system instead. Starting with the removal of the brake master cylinder’s pressure failure switch. Always tricky as this one is by now old and brittle. But I succeeded to remove it intact. Probably helped by the anti-seize paste I used when I re-fitted it a few years ago.


With that hurdle successfully out of the way, we could start flushing and bleeding the brake system. Starting with the front brakes which are fed through the rear chamber of the fluid reservoir. This chamber was also first emptied with a small manual suction pump, after which it was filled with fresh fluid. And the flushing/and bleeding could begin, starting with the front calliper on the right hand side. For both sides together, we used twice the contents of the rear chamber. No air came out.


As the reservoir’s front chamber can’t be emptied with my simple pump (a large syringe type affair) we had to empty this chamber by pumping the brake pedal with one of the bleed nipples at the rear open. My assistant was a bit overzealous though, emptying the front chamber too far. Which resulted in some air being drawn into the system. Luckily the air could be bled very easily though one of the two bleed nipples at the back.


Next job was flushing the clutch system. With the reservoir filled with fresh fluid, and the old fluid still in the pipe, it should be clearly visible when all the old fluid was expelled from the system. It was! But just to be sure all the old fluid was expelled, the contents of a full reservoir were flushed through the system after clean fluid came out of the master cylinder. Job done! Actually the biggest problem here was removing the rubber dust cap from the slave cylinder’s bleed nipple underneath the car! It had collected some oil, resulting in a rather slippery dust cap.


Next on the to-do-list where the wheels. They would certainly benefit from a good clean. Rather straightforward with warm soapy water and a collection of different brushes. I did need a shower afterwards!


Final job on the on the to do list was cleaning the two earth points behind the head lamp mounting panel. Hardly any oxidation there, only a lot of paint. So I cleaned away the paint around the mounting points and refitted the earth points using some copper slip to prevent future corrosion.


And the final job for the day was cleaning the steering wheel and treating it with a leather conditioner. The lack of use in the recent years had dried out the steering wheel’s leather cover. And after well over thirty years of service (it started life with me when I fitted it to a Mini Cooper, in 1994!), it could do with some tender loving care. It did soak up quite a bit of leather conditioner fluid.


Sunday, 10 January 2021

FHC resto nr. 119; Parts donor's yields

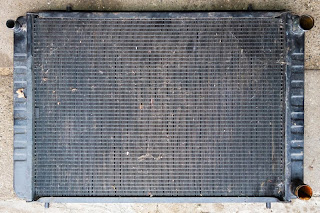
With the car passed on to its next, and hopefully final, chapter, it was time for me to go over the proceeds. Overall well pleased with the parts this car yielded. And I think it is safe to say that some might even manage to change my plans for the ’76 car. To start with this almost brand new looking radiator:

Radiator

Yes this is the later radiator model, so shouldn’t be fitted to an early car. But I like standardisation and reliability, and am not bothered too much about originality. I also firmly believe that a car is for driving, not for show grounds. So the ’76 car will get the later cooling system with the header tank instead of the overflow bottle. But the most important reason for this change is that the latter system is the better of the two! 


My original plan was to have another alloy radiator fabricated locally, to the same specifications as the alloy radiator
that was fabricated locally for my DHC But with such a good spare that seems like a waste of money to me! But before I commit myself I will have to flush and pressure test this one first! Just to be sure.

Wiring

Also some of the wiring harnesses, especially the main wiring harness, will probably find their way into the ’76 car. Though it doesn’t look like much in the picture above, a first quick check while removing them from the car showed some very unmolested wiring harnesses:


Engine harness RKC5511

Facia harnessRKC4348

Main harness PKC1946

Again a closer inspection of these three harnesses will determine whether they will be used or not.

Clutch assembly
An unexpected yield are the clutch cover and plate. As they looked almost new, I retrieved them from the engine. And with them removed from the car, the first impression proved to be correct, they indeed are almost brand new. So after a thorough clean, they too will find their way into the ’76 car.


Front screen
The same can probably be said about the front screen. While removing it, the front surface felt very smooth, so probably only very few (tiny) stone chips. There is also no delamination at the edges worth mentioning. Only a shallow chip in the left hand top corner. Probably there since the screen was fitted to the car at the factory, as it was completely hidden behind the stainless screen surround trim. Again a good clean and a closer inspection will determine whether it will be used or not (I have a few spares as back up though!).


Transmission
And finally the transmission. The car had only covered 87.173 kilometres, and the overall condition looked like she was pretty well cared for in het past life. So the plan is to use both gearbox and back axle for the ’76 car. I would have loved to put a 3.90:1 ratio back axle under this car. But I only have one spare axle with that ratio. And that will be used to build the new back axle for ‘t Kreng (the one in front in the picture below).


So the ’76 car will also get a 3.45:1 ratio back axle. Just as the DHC. As it stands now that will be the third one from the front., bearing serial number CL 11955. Will see how a bog standard Sprint engine will cope with this ratio. I take comfort in the fact that the Dolomite Sprint also came with this gear ratio.


And I want to keep the gearbox and back axle together for no obvious reason. So this gearbox, bearing serial number CL-130837C will find its way into the ’76 car too.


Of course for both the back axle and gearbox applies, that they will only be used after an inspection & a clean bill of health, and a good clean. And I have a small adaptation in mind for the gearbox, which I have already used successfully on the DHC’s gearbox. To be continued! 

Monday, 8 July 2019

Various small jobs on the DHC

After the brakes and fittings were successfully sorted last week, it was time for some smaller servicing jobs. To start with the renewal of the fluid in the clutch system. Bearing in mind I had no assistance, I first emptied the reservoir on top of the clutch master cylinder with a large syringe and cleaned out all the rubber muck that had gathered there in the previous two years since I did this job. After that it was simply a case of topping up the reservoir and pump the clutch pedal till the reservoir was almost empty and then quickly close the bleed nipple. By the second time I did this, the fluid coming out was clean and without any air bubbles. Time to quickly close the bleed valve again and switch to another minor task in that same area. Check the oil filter for leaks.


During the renewal of the oil and the oil filter a few weeks ago, I encountered a small problem while removing the old filter. Trying to unscrew the filter resulted in the adapter plate turning too! Turned out that the filter seal was stronger than the adapter plate’s seal. Resulting in the plate turning underneath the mounting bolt. After unscrewing the filter less than a ¼ turn broke the seal between filter and plate. In theory this could have dislocated the seal between adapter plate and engine block. So just to be sure I fired up the engine and let it idle for a few minutes. An inspection afterwards revealed no leaks. Though the area could do with a proper clean to get rid of some older oil and road grime …
Next job was bleeding the brake system. As with the clutch system I had to perform this task without assistance. Though it is slightly more time consuming this way it all went pretty smoothly. Starting with the rear brakes, I filled the brake fluid reservoir, opened the bleeding nipple and pushed the brake pedal down  a few times to start the fluid flow. Keeping an eye on the fluid level in the reservoir, I continued until clean fluid without air bubbles was emerging from the bleed hose. The same procedure was successfully repeated with the front brakes, though I have to admit that lying alongside the car to keep an eye on the bleeding hose and pressing the clutch or brake pedal by hand is fairly hard work!


While working on my cars I usually store the various parts that are coming off in the boot. And that is when I noticed that one of the screws to fix the number plate light was missing.


Originally they are fitted using small plastic screws. As these were all badly damaged when I removed them in the context of the car’s restoration I decided to use small steel screws instead. But to prevent damage to the light armatures I didn’t tighten them down fully. In combination with a slightly worn spring clip meant one screw managed to escape. To prevent this from happening again I pinched the clips back together and decided to place small rubber O-rings under the screws’ head to prevent the armatures from cracking. Will see how it holds now.
Another fault that came to light while working on the brakes were the dust covers for the hand brake levers where they pass through the back plates.


As you can see from the picture above they were well passed their prime. Nothing to worrying were it not that these were renewed only last year. So another (be it small) job to grace the to-do-list. But not before finishing of the work by cleaning the wheels in order to get rid of some road and brake dust. Hopefully I’ll be able to take the car for a drive tomorrow!


Friday, 19 January 2018

FHC resto nr. 61; Various small jobs

Not only were all (I hope!) parts coated or galvanised over the previous months, I also received the refurbished or new brake and clutch parts back from local brake specialist C&C parts. I dropped of all hydraulic parts at their premises a few months ago, with the brief to overhaul or replace them. Whatever was the cheapest solution. Well the only thing they overhauled was the brake servo, as it turned out the internals were as new. All other parts were replaced by new items as it was cheaper to replace them. Some were NOS, like the brake master cylinder (they even found the correct brake fluid reservoir !);


Others were produced locally like the clutch master cylinder;


And as they take less space when fitted to the car, that is exactly what I did, together with the coolant's header tank;


Another item that got the same treatment (store it by bolting it to the car) was the refurbished fuel tank, together with newly powder coated tank straps and the galvanised and black passivated studs;


Also used some of my (current rare) spare time to finish the newly coated fresh air duct. The duct itself was powder coated, the clips were galvanised and black passivated, whereas the rubbers are a mix of second hand original ones from my spares collection (like YKC320);


Combined with locally sourced replacements;


And the final item for this post is the reassembly of the gear lever extension. With all parts cleaned and coated that was the proverbial piece of cake. But still rather rewarding and relaxing to do!


Thursday, 23 March 2017

FHC resto nr. 51; Parts coating


A few weeks ago the repairs to the air-box-lid were finished, so all parts that should be powder- or E-coated were ready. And I am glad that I managed to drop of this batch of parts for paint removal, shot blasting and coating yesterday. It was slightly later than planned, but that's the price you pay when you have to much spare parts to search through. And the fact that these parts are spread over three locations and two countries doesn't help here either. But in the end I got everything sorted. A small selection ...


And to prevent any mistakes as to what part should get which coating or colour I decided to make an inventory of all the parts (Those of you who have been following this blog will notice that there are also a few parts there that will be used on my other TR7's)...


Added advantage is that both the coating company and I have a checklist to work from. And thus it should make life a lot easier. And if all goes to plan all parts should be ready within a week or two. When they return I can start on some proper restoration jobs, like assembling the heater, and cleaning and coating the inside of the fuel tank.


As you can see it looks pretty solid from the outside, and it was actually rather mint on the inside too when I pulled it from the car. But some 3 years in storage has resulted in a fair amount of surface rust on the inside. So once it returns I'll have to visit a local supplier to get me some Tank Cure to attack the inside!

Thursday, 2 March 2017

Not the start of the driving season ...

With February behind us, the mandatory three month hibernation for my TR7's is over for another year. And because I am enjoying a short holiday the plan was to give 't Kreng a short check up in the morning, and take her for a ride in the afternoon. All under the pretence of preparing for the first event of the  year "De Nacht van het Oosten" just over a week away.
As the car had behaved rather well last time I drove her I didn't expect much wrong. My main worry were the front bearings but they turned out to be OK. So I changed my attention to the fluid levels; coolant and brakes were up to their normal level. Not so for the clutch fluid. After removing the cap I was greeted by a rather empty reservoir ...


A quick inspection under the bonnet and in the interior with a small torch, showed that the master cylinder had no visible signs of any leaks. Safe to assume the leak was elsewhere. And there is not much else on the car were clutch fluid can leak, the slave cylinder. As this cylinder (as usual) was covered in all sorts of oily muck it was impossible to say whether it was leaking or not. So only one way to find out. And that is by removing it. With the two mounting bolts removed I carefully took the slave cylinder of (as in not to dislodge the push rod). Once free of the push rod the damage immediately became clear as a fair amount of fluid spilled out through the opening of the dirt cover ...


Initial plan was to use some new seals to rebuild the slave cylinder, but whilst searching for the correct seals I found two reconditioned slave cylinders in the same box. So I opted for replacing instead! Sadly it wasn't as straight forward as that. With everything cleaned and the new slave cylinder firmly in place I found out that the connecting hole for the flexible hose was deeper in comparison to the old cylinder. As a result of which I couldn't fully tighten the connector. At that time I remembered that the guy who made the flex hoses for me many years ago also supplied some copper seals, just in case. Glad that I remembered where I stored them.
Sadly there was nobody around to help with bleeding the clutch so with everything connected up it was time to store the tools and pull the cover back over the car. And time for a closer look at the leaking slave cylinder. Glad I made the decision I did, as there are some score marks on the piston the inside of the old cylinder has some patches of rust and scoring of the bore ...


Hopefully back on the road soon!