Showing posts with label Locks. Show all posts

Saturday, 11 December 2021

Glove-box-lock failure

During the final route check of our recent Nachtrit something inside the mechanism of the glove box lock broke. As a result of which the glove box lid couldn’t be opened anymore. The cause for the failure became clear immediately after I got the lid open. The back of the lock carrier was torn open.


This was most likely caused by the weight of the trip meter fitted to the lid for the past 20 odd years!


But it didn’t fully explain what really had failed. So time to dismantle the failed lock mechanism. It even took me a few seconds to work out what really was broken. Can you spot it?


The anoraks will have noticed by now that something’s missing from the rear of the turning knob/lock barrel carrier (bottom picture 2nd row left). The rear has been torn clean off (bottom picture top row 2nd from the right). And as such the cam at the end wouldn’t move anymore to operate the lock’s plastic latch. Now looking at alternatives to get the strain of the newly fitted lock. So to be continued.

Saturday, 13 November 2021

FHC resto nr. 134; Brake pipes part 2


Another small step in the car’s restoration today. I started bending the brake pipes. And to “warm up” I started with the two smallest ones, the pipes between the brake master cylinder and the pressure reduction valve.


Being small means they are easy to handle while trying out the new bending tool. But the disadvantage is that with the compact size and the right angled connections, they need to be shaped spot on. Otherwise the pipe's fittings will be difficult or impossible to engage in their destined threaded holes. Both needed some tiny adjustments for a proper fit.


And while I was in the shed with the correct tools at hand, I decided to fit the safety hooks to the bonnet. A few more parts that I no longer have to worry about.


Always rather satisfying to fit new or reconditioned parts to a car! Now thinking what to do with the rubber buffers (ZKC 287) for these hooks. The early ones seem to be no longer available and the original ones that came with the car are really not good enough to be reused. Choices!

Sunday, 31 October 2021

32nd Edition of “De Nachtrit”


The preparations:
After last year’s cancellation of the event, due to the Covid pandemic, we decided that 2021 would go on regardless! But that meant we had to find a Covid proof format for our night time navigational rally. And that’s what we did. Though it wasn’t up to our normal standards. So no nice accommodation for the reception, no coffee and vlaai and no beers in one of the cellar bars at Rolduc afterwards. Instead the start and finish was on the rather bleak parking area of Roda JC football club's stadium in Kerkrade (NL).
But before that some work had to be done, to start with translating the road book into a GPS file for the satnav. Didn’t go as planned but on the Thursday evening I was finally able to upload the file to my GPS device. Frankly the built in “intelligence” of these systems is way beyond me!


Next on the to do list was a check over off the car of choice. Which was ‘t Kreng of course! I hadn’t been able to spent much time on her, so I took a day off from work last Friday.


And the day was mainly spent on getting her out of the shed and on to the drive and a basic check of all systems. Nothing really wrong, only the engine oil and coolant levels needed topping up a little. But that was more for peace of mind than a real necessity! And I found some proof of the cars hard use over the years (almost 25!).


Final job was fitting a removable mounting point for the satnav. For this I used an old and lightly damaged facia top grill panel, to which I glued a disc for the mount’s suction cup. Suctions cups were also used to secure the rally plate!


The final route check:
As ever our task, on the day of the event, was to do a final check of the route. This is mainly to check for any last minute road works or diversions. But also to have the road book checked by someone who doesn’t know the route. This task was for my regular navigator. Sadly when we set of early on the Saturday morning it was raining heavily. And this highlighted one of the mayor design flaws of the car, the demister. It took a long time before all the windows were clear. Maybe the car was punishing me for the fact that she had to spent the night outside in the rain for the first time in many years! But by the time we arrived at the start location all windows were clean. But it was still raining. And the rain would stay with us on and off for most of the day.


As I didn’t fancy getting wet while taking pictures, I didn’t take many! And I concentrated on the driving instead. And rightly so, as in places the driving conditions were very treacherous indeed. Nicely illustrated at the cross roads near the Val Dieu abbey. It was covered in fallen leaves, resulting in no grip at all for the front wheels. Only remedy to prevent the nose from sliding wide was to use the throttle to get the back out, and the nose in the correct direction. Good fun indeed! And there was lots of mud on the roads, caused by harvesting farmers. Added bonus of the mud was that the car got a nice new streamlined coating.


But apart from the challenging conditions, there were no more problems or diversions. So well within the time schedule we were back at the start, with an average speed of a little over 50 km/h over the almost 160 kilometre route. And a rather muddy car.


The event:
Despite the difficult pre event conditions due to Covid, we were pleased to get 25 cars at the start. A small selection.


And with the last car disappearing into the rainy darkness, we headed to a local restaurant to while away the time over some very nice food, while the teams were negotiating a wide variety of different types of roads. Luckily for them the rain stopped pretty soon after the start.
After finishing the food we went back to the parking lot from the Roda JC stadium, to welcome the teams at the finish.


There’s always some doubts about the route, but we needn’t have worried. The first team arrived nicely on “schedule”. And close to midnight all teams were accounted for.

The aftermath:
Most important job for the day after, was a trip to the local car wash of course. But not before I enjoyed the car during a very fine Sunday morning. With lovely weather and autumn colours. And more slippery leaves ...


After which the car was treated to a shower at the local car wash, before being tucked away in the shed.


There was a slight problem though. During the day’s driving I found out that the glove box lid couldn’t be opened anymore. But back in the shed I managed to open it with a slim screw driver from the car’s tool roll and the smart phones led light. With the lid open the cause for the failure became immediately clear.


Clearly visible is that the back of the lock is torn open. This has probably caused the lock innards to come apart, resulting in the lock not functioning anymore. Luckily I have a few spare glove box lids in the shed so switching the lock mechanism was only a few minutes work. Only down side is that the current boot and glove box key won’t fit anymore.


As for the reason of the locks failure. This is probably caused by the trip meter hanging on the lid in combination with many badly surfaced roads over the past 20+ years. I might go looking for a method to take some strain from the lock mechanism over the winter.
I have to admit that from a driving point of view it was a good weekend, clocking op circa 670 kilometres. Though I will quickly forget the bill for the 102 RON fuel!
And to finish this post a picture of the imprint left behind by a small leaf that managed to stick to the rear bumper long enough for it to leave a visible imprint in the built up dirt 😊


Sunday, 13 December 2020

Parts donor part 3

I spent some quality time in the shed again yesterday afternoon, spending a small amount of time on the ’76 car (more on that later). But most of the time was spent clearing out the interior of the parts car.
My original plan was to remove the dashboard assembly and the main wiring harness. But I thought it would be better to first strip the rest of the interior. This was prompted by the fact that a lot of the interior trim had already been (partially) removed or loosened.
As the seats were already loose in the car that seemed to be the best place to start, followed by the centre console (yes I had to crawl underneath the rear of the car to undo the hand brake cable, in order to remove the gear lever surround) and the rear bulk head trim.
The parcel shelf is only fit for the skip, the rear bulkhead trim might be useful in future. So that was put aside, leaving me with a fairly empty interior.


Next came the body harness (RKC 3630). Most of the connections had already been disconnected. Only the earth points and heated rear window wires were still in place. Easy!
As there was still plenty of day light left, I removed some more parts including the very dead boot lid struts (clearly replaced for obvious reasons 😝), the door strikers, the rear quarter grilles, and the rear window.


I was quite surprised that the last item only took me about 5 minutes to remove from the car. And the seal looks like it might be fit to be used again after a bit of cleaning. Final pieces I removed were the drip gutter trim pieces. Also easy using a soft faced hammer.
The final job for the day was removing the carpets and inspecting the floor sections.


As you can see are both rear sections in fairly good condition. But both foot wells have signs of standard amounts of rust, with the drivers foot well also showing signs of a water leak. Might be that some extra welding is necessary in that area.


To be continued
!

Tuesday, 29 September 2020

FHC resto nr. 110; More small jobs

Or should I say that I entered the end-of-my-holidays-frenzy! At least I managed to complete a few more small jobs on the car.


To start with the interior light armature. I sourced that from the shed over 4 years ago, with the idea to clean it and fit it to the car in the then near future. Sadly life intervened in a negative way. Fast forward and last Sunday I was going through the small parts littering my study. As the F1 Grand Prix of Russia had finished, and the weather was rather wet, I thought it a good idea to clean the armature. As I had found a few extra spares in the past years, I decided on a little cleaning experiment.


To get rid of the oxidation I dropped the armature for 15 minutes in a lukewarm solution of cleaning vinegar, rock salt and water. Turned out to work quite well as the picture below illustrates


Another job that had been haunting me was the boot light switch. The very early original item (606239) got lost during the move of all my parts from René’s place to the shed. At first I didn’t think much about it as I had enough of the later switches. And that is when I found out that the later switches wouldn’t fit. Also the early left hand boot hinge I had prepared turned out to be missing its welded on tab to activate the switch. Time for a rethink!
So one of the items that were picked up after powder coating was the part of the boot lid hinge from a later car that bolts to the bottled. And I found out that I had a freshly galvanised tab between the coated parts! So these were fitted together.


After which it was time to remove the left hand hinge from the boot lid and replace it without damaging the paint work. It took me almost an hour but I succeeded. Also managed to fit a later type switch. Although it works I am not very impressed with the fit. Luckily it is mostly hidden from view! Though I will probably have a go at adapting it to get a slightly better fit …


And the final job for a day well spent in the shed was fitting the door strikers. The driver’s side went rather smoothly.


Though I have some doubts about the right hand (passenger side) latch. With the latch fully engaged there is a fair amount of free movement. Which isn’t there on the driver’s side. Looks like I’ll have to fit some door seals first, to see if that changes the matter. I hope so! Otherwise I’ll have to prepare another latch.

Saturday, 19 September 2020

FHC resto nr. 104; Suppressor and door strikers

The title of this post says it all. I spent a few hours on two of the many small jobs that are part of a restoration. Call it stop gap work 😁To start with the suppression capacitor (UKC2211), which is or should be fitted between the coil and the cars body (or earth point) to reduce the signal distortion caused by radio interference. This was pretty straightforward. It only needed a good clean and a new spade connector before it could be fitted to the car.


But probably most of the time was lost searching for the correct connection terminal on the coil (6V Bosch high performance ignition coil #0221124001). When you ignore the labels it even looks a bit like the original Lucas coils!


Next job was reassembling the two door strikers (YKC2031).


These were disassembled, cleaned, shot blasted and gloss galvanised well over 2½ years ago. But I never got round (or forgot) to look into the two rubber damping gaskets that go between the three parts of the striker assembly. As can be seen in the picture above the lower gaskets were in good condition. The upper ones were not. But that was easily solved with a pair of striker seals (ZKC369) from my spare parts stock.


The eagle eyed viewer will have noticed that the striker ring in the picture above has a slightly different colour. Well that is caused by the fact that one of the two parts I sent off for galvanising came back heavily bent. So that one had to be replaced. And that also meant a different coating, because galvanising is a batch process. So not very cost effective for one single small part! 
And with all parts ready, assembling the strikers was very straightforward indeed.


I would have preferred to fit the strikers to the car immediately, but it turned out I had no more striker seals left. At least I couldn't find any quickly. So that is for another day.
 

Sunday, 23 August 2020

FHC resto nr. 100; A jubilee post

On the 19th of October 2013 I became the owner 03-NF-52, a fairly early Dutch TR7. The car was first registered on the 6th of October 1976. At the time I didn’t really want to buy another TR7, but the car was fitted with my favourite alloy wheels for a TR7. And the price was right. So I bought a slightly over priced set of Wolfrace Turbo wheels with a car attached to them 😳. And as soon as the car was in the shed the wheels were removed, refurbished, and fitted to my DHC.

Initial plan was to get rid of the car and make a small profit! But my longing for an early car (with a few twists) was stronger. New plans were made, and on Wednesday the 15th of January 2014 I started with the first stage of the restoration, dismantling the car. My initial time schedule was to have the car ready by the time it would be tax exempt in October 2016. But that schedule has since been abandoned!

And this weekend I reached the ninety-ninth blog post on the restoration of this TR7. Time to celebrate this fact with a jubilee post! So for the hundredth post I will bore you with a picture post. Looking back at the work done, using my favourite pictures and parts of the project so far.

2013-10-20: Patiently waiting for the things to come.
In the shed alongside ‘t Kreng.

2014-02-12: Dismantling completed.

2014-03-15: A photographic experiment with the bare seat frames.
Shortly before they were sent off for blasting and coating.

2014-03-15: Rear suspension parts ready,
which was fairly easy as I had already prepared them as spares!

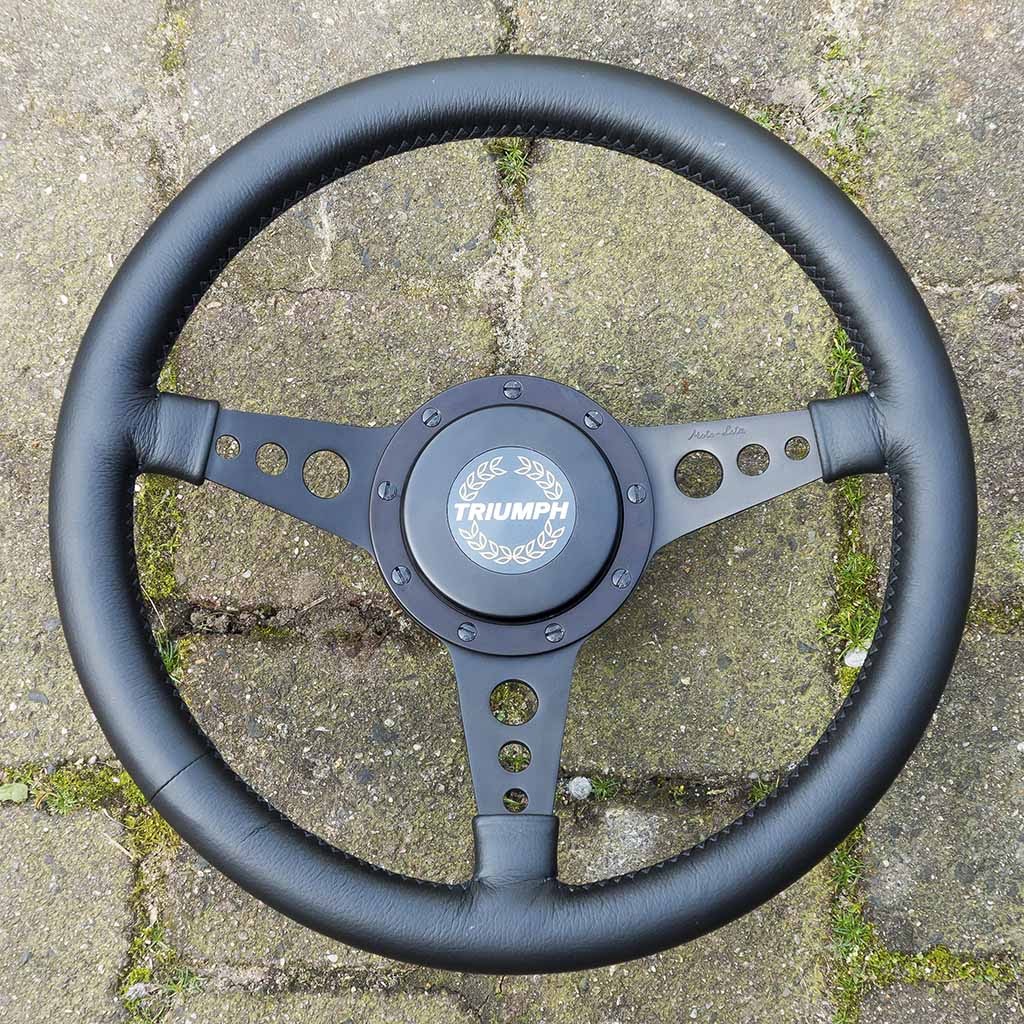
2014-03-30: 14” Moto Lita Mark Four steering wheel with a custom design billet centre cap, using an original late TR7 steering wheel’s centre badge

2014-05-24: Rectifying the butchered boot floor
and the incorrect late-small-filler-cap-rear-deck.

2014-06-25: Creating access for various relative small repair sections

2014-07-10: Welding completed and waiting for final shot blasting,
and application of a base coat primer

2014-07-30: Collected the seats (and other interior trim parts) from a local car trimmer. The Tartan cloth was ordered (after much mail traffic) from House of Tartan, with the pattern being based on the Menzies Clan’s black & red tartan. And this pattern was  adapted slightly to my personal taste.

2014-07-30: As the original parcel shelf was beyond repair, I ordered a GRP replica.
But it’s finish was so bad that I had it recovered too. And I have to admit it looks brilliant!

2014-08-25: The car was moved for the next stage: paint preparations.

2014-11-08: Paint preparations slowly taking shape.

2015-02-05: The first visit to the painters. The interior, the engine bay and the underside painted in “Nearly-Topaz-Orange”.

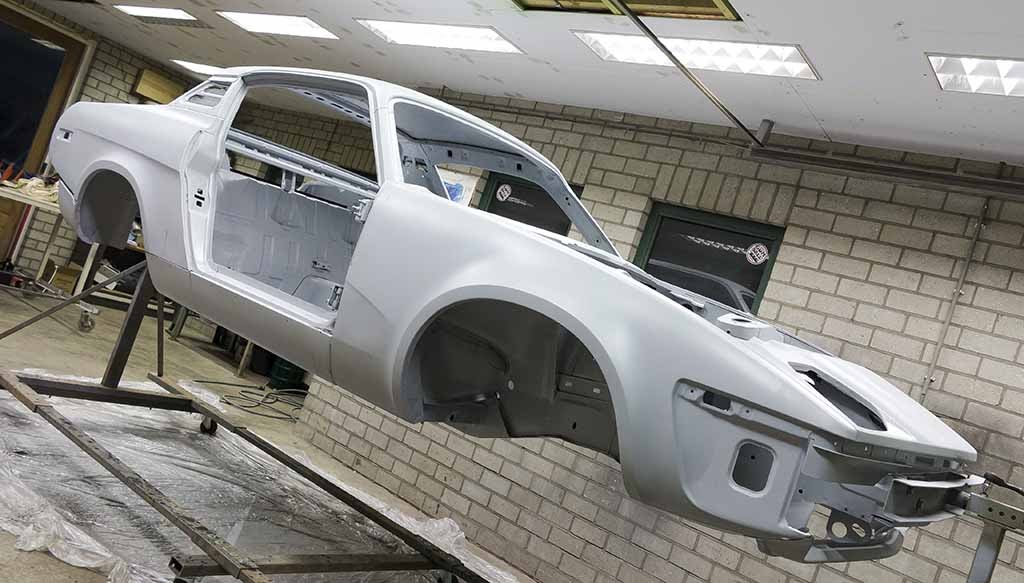
2015-06-13: The body, doors, boot lid and bonnet are ready for painting.

2015-09-07: Painted in its chosen colour at last, and waiting for the satin black paint to be applied to the sills and the rear light panel.

2015-09-14: Painting completed and temporary back in the shed.

2016-01-14: One of the little projects that got out of hand time wise.
Re-manufacturing the body tags (with a twist) and the VIN plate.

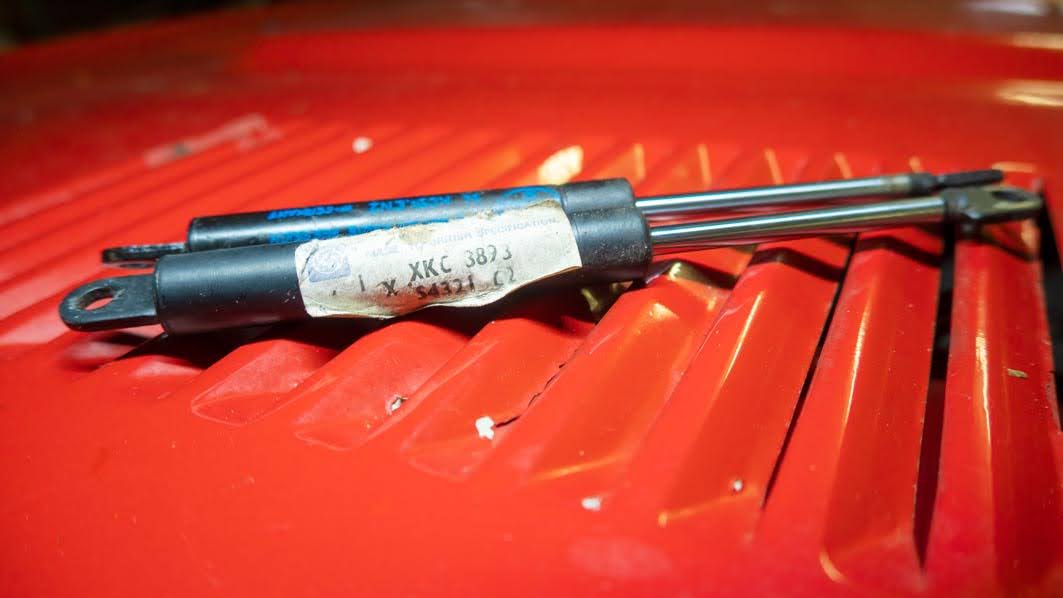
2017-05-25: Inspecting the inside of the fuel tank after powder coating the exterior,
but prior to preparing and coating the inside.

2017-05-30: The back of the car slowly taking shape.

2014-12-20: Lots of smaller parts after sand blasting.

2018-01-04: And some of these parts after zinc plating and (black) passivating.

2018-03-31: A sad farewell. Clearing the shed at René’s place after he passed away.

2018-06-30: Slowly picking up work on the car again …

2018-09-14: The finished headlamp supports.

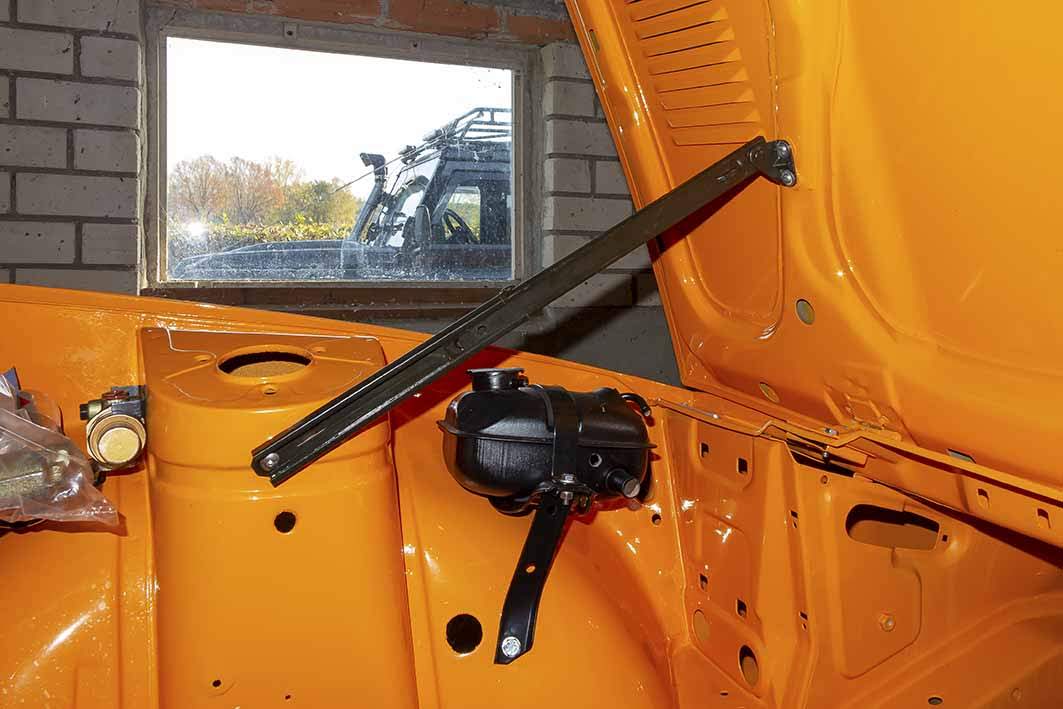
2018-11-03: Fitting the bonnet stay with my daily driver patiently waiting outside the shed.

2019-01-06: Refurbished parts for the boot lid lock mechanism.

2019-03-23: The interior slowly taking shape after fitting the reconditioned heater unit.

2019-09-23: Fitting the striping to the doors.

2019-12-08: Refurbishing the door handles finished.

2019-12-27: Fitting the door lock mechanism and VIN plate
(for the anoraks, I turned it through 180°)

2020-02-29: Fitting a few exterior trim parts.