Showing posts with label Fuel system. Show all posts

Sunday, 23 March 2025

DHC repairs #8: Gathering parts for the body repairs


A few weeks ago the DHC’s body shell was dropped off for some much needed welding. A few days later the body was fitted to the rotisserie, which should make the work a lot easier. After which it was time to gather all the parts and panels together that will be needed for the shell’s repairs, including a few parts needed for some (non-original) adaptations. Starting with the removal of the early boot lid stay bracket from the damaged shell, and cutting part of the inner frame from a very rusty door to adapt an early door for the later rectangular locking knob.


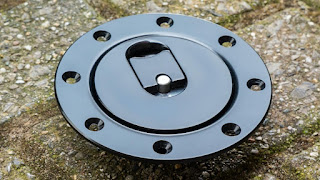
Another (less easy!) adaption will be fitting an alloy fuel filler cap. This was actually planned to be fitted when I restored the car about 15 years ago. But I forgot that it meant a fair amount of cutting and welding around the filler neck area. And I only realised that when the shell was painted. So at the time that plan went down the drain!


And of course this set, of new wings and nose panel, will be transferred to the work shop too. That is planned later the coming week. And this will also give me the opportunity to inspect the shell’s bottom properly. The spoiler is included to check the distance and alignment between the lower front parts of the new wings.


Last part that needs to be dropped off at the workshop will be the donor body. This should provide good condition sills and other patch panels. (The reason I don’t use this rust free US shell is because of extensive and badly repaired accident damage to the LH front).


Sunday, 14 July 2024

Finishing ‘t Kreng’s water pump: take 3

It’s been a while since my last post. Not that I have been idle, but because ‘t Kreng’s cooling system has been putting up quite a fight. I left this job with “only the coolant hoses and the carburettors left to be fitted. Glad I only fitted the coolant hoses and then started filling up the coolant system. Sadly by the time the coolant level reached the infamous connecting tube UKC2538 the coolant started to leak out, not good. Time to call it a day and have a few beers!
After visiting the shed a few days later to collect my trolley jack I found back some motivation to carry on with the job! The sooner ‘t Kreng is back on the road the sooner I can continue work on the ’76 car!


And when I got home the inlet manifold was removed. But on closer inspection I couldn’t find anything wrong, though there had been a little lack of resistance when pushing the manifold onto the connecting tube. Time to order some new O-rings in the correct diameter just to be sure, taking the necessary measurements from the various parts. And more waiting for parts to arrive.
In the end the O-rings arrived after two and a half weeks! And they indeed were slightly larger compared to the ones supplied some time ago from a UK based parts supplier. Time for the second attempt to fit the inlet manifold. This time there was a noticeable increase in resistance while mating the manifold to the connecting tube. But again no success! While pouring coolant into the system through the thermostat cover a leak sprang from the connecting tube as soon as the level got above the top of it. Some expletives were uttered! At least the water pump itself was still leak free.


And time to remove the inlet manifold again. This time the cause for the leak was rather obvious. The upper O-ring had caught the edge of the manifold opening and got partially dislodged. Time for take three. But first I had to order a new manifold gasket as the “old” one got damaged while removing the manifold.


Sadly I was again let down by a supplier or courier. The gasket should have arrived on Saturday morning at the latest. It didn’t. As the car is booked for its biennial MOT this Wednesday I couldn’t wait much longer. Luckily I stumbled upon a long forgotten stock of gasket paper with different thicknesses, hidden in the attic. So I had a go at making my own gasket. Using the old item plus the inlet manifold as templates. Fairly straight forward, but time consuming. And as it was late in the afternoon by now I decided to call it a day. Oh and I forgot the pictures of the finished product.
So this morning I had a fairly early start for my third attempt. I have to admit that I had used some of the time while waiting for parts to arrive to work out a plan to fit the manifold. In the end I decided it would be better to put the connecting tube into the manifold before adding the manifold to the engine, using telephone pliers to keep the tube as low as possible in the manifold while adding the lower part of the tube into the water pump cover.
And with the manifold and home-made gasket roughly in place I could again start fitting the stainless bolts. These were chosen to reduce galvanic corrosion between steel bolts and alloy engine parts.


Everything seemed to go well, but when adding the second to last mounting bolt, it didn’t want to go in properly. I managed to get it in by hand in the end but it felt as if the thread in the head is on the way out. So I was rather careful to (over)tighten it. Next time the manifold comes of said bolt hole will probably need a thread repair.


And with all bolts tightened up it was time for the dreaded final task. Filling up the system with coolant. I again decided to fill it through the thermostat cover. But when the thermostat house was starting to fill up there was the dreaded sound of escaping coolant. Luckily it turned out to be coming from the coolant hose that runs between the thermostat and the radiator. This was still fitted to the radiator, but the other end was resting on the water pump cover. And after cleaning of the coolant I could conclude that the tube seemed to be waterproof. Result!


Left me with the rather relaxing job of refitting all hoses, the carburettors and the strut brace. But not before these were treated to a good clean.


Final job for tomorrow evening will be topping up the coolant level and hopefully a test drive to see if everything still works as it should.


Update 15-07-2024: Tonight I first checked the coolant system for leaks (there were none) and topped up the coolant level. And after expelling any trapped air and checking the fuel lines for leaks under pressure, it was time for the final test, starting the engine. It started promptly after which I let it run till the temperature gauge reached the ¼ mark. And after that there was the much dreaded final inspection for any leaks. So far everything is dry. A test drive is scheduled for tomorrow evening, and MOT on Wednesday. And hopefully time to enjoy the car afterwards!

Sunday, 7 May 2023

DHC repairs #4: Tank removal


As the title suggests it was time for some spannering fun. And as can be judged from the interval with the previous post the tank straps decided to put up a fight!
My first line of attack was a traditional approach, using a deep 17mm socket and wrench to undo the four nuts. But it turned out that all nuts were rusted solid to the tank's support straps. Which resulted in the straps trying to wind themselves around the socket. Trying to keep the straps in position with an adjustable spanner didn’t work either as I only have two hands. The first round was for the tank straps, time for a change of plans.
After discussing this with a few friends we agreed that the best solution would be to use a pneumatic wrench and an assistant to keep the straps in check. Sadly that didn’t work either because the (very large) compressor is situated at the other end of the premises. As a result of which we ran out of air hose well before we reached the car.
Time for plan C, forget the compressor and use a cordless impact wrench. Biggest problem here is that I don’t have one, nor any of my friends close by. Luckily a local employee from one of our framework contractors came to the rescue. Enabling me to borrow this lovely toy over the weekend.


Usually this heavy duty tool is in daily use on this kind of work:


Needless to say this made light work of the removal of the tank’s support straps. Actually so easy that I had 3 of the 4 mounting points undone by the time the assistance arrived! Though the extra pair of hands made the actual removal of the tank so much easier.


As can be seen in the pictures above the damage to the tank is not limited to the bottom of the tank. So it looks like it will only be fit for the skip. Luckily the tank’s support straps and mounting studs turned out to be in fairly good condition. And after some tender loving care they will be fit to be used again. Result!


And with the tank removed rather quickly I was able to remove doors, boot lid and hood frame. But the biggest challenge is probably still in the future! Removing all parts stocked in the other spare body I will be using!

Sunday, 23 April 2023

DHC repairs #3: Bodyshell nearly disassembled

As I had a few spare hours this weekend I decided to load the tools into the Defender and head for the shed. Main job was preparing the shell for the removal the fuel tank. But I started with the removal of a few remaining parts that were fitted with pop rivets. And I hadn’t forgotten the cordless drill this time. Though after finishing with the drill, I found out I did have forgotten to pack a few items in the boot of the Defender. A pair of axle stands and the socket set to be precise. Bugger!


And this meant it was half an hour later that I could start with the removal of the back axle. Only to find out I hadn’t enough storage capacity for the fuel still remaining in the tank. Though I did have enough (small) containers to make sure no more fuel would escape ones the rear of the car was lifted. Something to bear in mind when I tackle the removal of the tank itself.
With the rear of the car securely supported, the actual removal of the back axle was straight forward. Support the axle on a trolley jack, remove the mounting bolts and pull the axle from underneath the car. As easy as it sounds. And hardly surprising bearing in mind that the axle was swapped only a few years ago.


And with the axle out if the way, I could have a proper look at the fuel tank and its fixings. As expected all four nuts are badly rusted. So these got a good squirt of penetrating oil.


In the lower right corner of the picture above you can glimpse a rather strange fold in the bottom of the tank. And a closer inspection of the tank showed some rather strange damage to the underside:


As the tank's centre part looks fairly undamaged that rules out the back axle as possible culprit. There is also no visible outside (impact) damage to confirm this. So what happened here? The most likely explanation I can come up with, is that somewhere in the car’s earlier life the vents for the tank got blocked, thus creating a vacuum inside the tank. And that resulted in the damage visible. The fact that I have seen similar damage on a few tanks in the past might proof this!? A shame really as apart from this the tank looks in pretty good condition from the outside. At least it doesn’t leak!

Sunday, 21 August 2022

More 10CR checks


Spent a few hours over this weekend, preparing the car for the 10CR. Starting on one of the lifts in a friends workshop, with the aim of checking all rubber fuel hoses from below. First check was the fuel hose between the (FI) fuel tank and the 8mm metal pipe running to the engine bay. After cleaning 12 years of road grime from it, I found out there was nothing really wrong with it. Which turned out to be a good thing! Because I was reminded that on a FI tank the supply hose connection is 12mm. Clearly forgot that over the 12+ years since I restored this car 😶 At the time I fitted a fuel resistant 8mm hose with a 2mm wall thickness inside the hose end that connects to the 8mm pipe.


So that would have been a challenge to replace with a half empty tank and only normal fuel hoses at hand. All the rubber fuel lines in the engine bay were also in good condition. Not really surprising as these were all renewed in the past few years.
To prevent future problems, I think I will replace the two separate outlet and sender units for a normal carburetted version. The tank’s redundant hole should be straight forward to close up with a round steel plate with the same dimensions as the sender unit’s base plate.


Next job was a bit of tinkering and cleaning of the carburettors. Starting with the suction chambers and pistons. Main job here was polishing the inside of the suction chambers and the pistons outer rims. Though one of the pistons had clearly accumulated some dirt on its piston’s surface.


With the internals cleaned I spent some time on the custom carburettor linkage. Mainly consisting of a good clean and some fresh grease inside the link rod ends. Inspecting the rod end’s surfaces proved there was nothing wrong. And as such still one of the better adaptations on this car.


Final jobs were a detailed general check of the engine bay; emptying the catch tank, changing the routing of the two fuel hoses connecting to the carburettors, checking the earth point (found and rectified one loose bolt behind the RH headlight, caused by a stripped thread). Next weekend I will have a look at the front suspension. But in between I’ll start with preparing the route for my GPS and mark the route out on a good old fashioned paper map!


Wednesday, 22 June 2022

MOT Time

Some of my rather scarce spare time over the past month or so was spent preparing the cars for their biennial General Periodic Inspection (or MOT for the UK residents). First in line was ‘t Kreng. During her final check-up I couldn’t find much wrong. So I wasn’t surprised that she passed without any advisories. As always it was good to see that all the vital points were still spot on.


With a fresh MOT for ‘t Kreng she was put back in the shed. And the DHC was woken after a 9 months long hibernation, to be brought home. The engine did need some persuasion with a liberal dose of quick start in both carburettors. But after a few minutes on the road the cobwebs were already blown away. But the handling was a bit vague during the short drive. Hardly surprising as the tyre pressures had dropped a bit. From the usual 2,0 Bar all round to a random 1,7 to 1,8 Bar.
Another problem I found was a slight knocking noise while checking the LH front bearing for play, with the wheel of the ground. But I wasn't convinced it was coming from the bearing, as there seemed to be no play. There was also no noise coming from the bearing. First impression was that the captive nut for the shock absorber might be loose. Because I thought it was too hot for any physical work, I decided to try my luck and have the car MOT’ed.
But while turning of the motorway a few minutes away from the work shop I did smell fuel. And on arrival we soon found the culprit, another split fuel hose. For those who regularly follow these ramblings might have a Déja Vu! And another job for the up coming service.


Luckily the hose (supplying the rear carburettor) could be replaced within minutes. And the inspection could begin, starting with the emissions. And it immediately became clear that the engine was running a little better, compared to when the car was driven into the workshop. And the emissions were nicely within the prescribed limits too (CO ±3,5%; CO2 ±10,0% and λ ±1,0) They were actually more or less the same as ‘t Kreng’s.


All other inspection points were also passes without any advisories or worse! And the noise in the LH front suspension? That turned out to be a little play in the top cone caused by the fact the suspension wasn’t loaded, and as such not an inspection criteria. So another two year certificate of good health for both cars.


Sunday, 19 June 2022

Pré MOT check DHC


But I’ll start with a belated happy 42nd birthday for the DHC, as she was first registered on the 6th of June 1980! As for this posts title: The initial plan was to fully service the DHC yesterday, in preparation for its upcoming biennial MOT. But with temperatures in the shade of almost 35ºC that wasn't an inviting perspective. So I decided to limit the work to the most vital bits and carry out the service somewhere after the car’s MOT later in the week.
I started with a check of the wheel bearings and a visual check of the other visible suspension bits. After which I moved my attention to the engine bay. Traditionally the first check is the water pump area. Always nice to see nothing wrong there.

Routing and condition of the choke cable.
The (6mm fuel) hose is there to prevent the cable from kinking.

Checking the custom throttle actuator rod

No play or funny noises on the viscous coupling and pulley bearing.

Clean connectors on the hi-torque starter motor

Checking lights etc.

And finally a few overview pictures of the engine bay. Certainly not concourse condition, but not too shabby either after 12 years of use since her restoration was completed.