Showing posts with label Front screen. Show all posts

Sunday, 10 January 2021

FHC resto nr. 119; Parts donor's yields

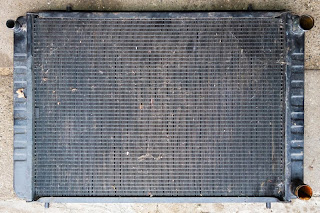
With the car passed on to its next, and hopefully final, chapter, it was time for me to go over the proceeds. Overall well pleased with the parts this car yielded. And I think it is safe to say that some might even manage to change my plans for the ’76 car. To start with this almost brand new looking radiator:

Radiator

Yes this is the later radiator model, so shouldn’t be fitted to an early car. But I like standardisation and reliability, and am not bothered too much about originality. I also firmly believe that a car is for driving, not for show grounds. So the ’76 car will get the later cooling system with the header tank instead of the overflow bottle. But the most important reason for this change is that the latter system is the better of the two! 


My original plan was to have another alloy radiator fabricated locally, to the same specifications as the alloy radiator
that was fabricated locally for my DHC But with such a good spare that seems like a waste of money to me! But before I commit myself I will have to flush and pressure test this one first! Just to be sure.

Wiring

Also some of the wiring harnesses, especially the main wiring harness, will probably find their way into the ’76 car. Though it doesn’t look like much in the picture above, a first quick check while removing them from the car showed some very unmolested wiring harnesses:


Engine harness RKC5511

Facia harnessRKC4348

Main harness PKC1946

Again a closer inspection of these three harnesses will determine whether they will be used or not.

Clutch assembly
An unexpected yield are the clutch cover and plate. As they looked almost new, I retrieved them from the engine. And with them removed from the car, the first impression proved to be correct, they indeed are almost brand new. So after a thorough clean, they too will find their way into the ’76 car.


Front screen
The same can probably be said about the front screen. While removing it, the front surface felt very smooth, so probably only very few (tiny) stone chips. There is also no delamination at the edges worth mentioning. Only a shallow chip in the left hand top corner. Probably there since the screen was fitted to the car at the factory, as it was completely hidden behind the stainless screen surround trim. Again a good clean and a closer inspection will determine whether it will be used or not (I have a few spares as back up though!).


Transmission
And finally the transmission. The car had only covered 87.173 kilometres, and the overall condition looked like she was pretty well cared for in het past life. So the plan is to use both gearbox and back axle for the ’76 car. I would have loved to put a 3.90:1 ratio back axle under this car. But I only have one spare axle with that ratio. And that will be used to build the new back axle for ‘t Kreng (the one in front in the picture below).


So the ’76 car will also get a 3.45:1 ratio back axle. Just as the DHC. As it stands now that will be the third one from the front., bearing serial number CL 11955. Will see how a bog standard Sprint engine will cope with this ratio. I take comfort in the fact that the Dolomite Sprint also came with this gear ratio.


And I want to keep the gearbox and back axle together for no obvious reason. So this gearbox, bearing serial number CL-130837C will find its way into the ’76 car too.


Of course for both the back axle and gearbox applies, that they will only be used after an inspection & a clean bill of health, and a good clean. And I have a small adaptation in mind for the gearbox, which I have already used successfully on the DHC’s gearbox. To be continued! 

Friday, 25 December 2020

Parts donor part 4

The disassembly of the parts donor is going pretty well. Mainly because I was able to spent a few hours in the shed in the days before Christmas.


I started with the dashboard assembly. As most of the interior had been removed already, this was pretty easy. And here I started with the instrument upper roll. Which is obvious of course. All screws came off without any drama, as did the roll itself.


Next in line was the instrument panel. Here I first removed all the screws holding it place, so it could be pulled up a bit to gain better access to all connectors at the back. And with everything disconnected, the instrument panel could be retrieved from the car.


After which removal of the facia was very straight forward indeed. 
At this stage it started to become clear that the main wiring harness is in pretty good condition. So far the only adaptation I found was one “fire starter”, or Scotchlok connector as they are also known. Though the amount of added wires I collected in the passenger foot well might suggest something different!

Final task for the interior was the removal of all the remaining wiring. But for that I also had to disconnect a few wires in the engine bay. Here I encountered a completely new problem. There were so many leaves in there that it was impossible to find most of the connectors. Luckily I had a large vacuum cleaner at hand. After all the leaves and small branches were removed, I was able to access all the wiring connectors in the engine bay and disconnect them. Followed by the same action for the nose of the car:


With that sorted I was able to gently pull back the wiring harness into the cars cabin:


And from there remove it entirely from the car. I might well change my plans for the ’76 car now. As a quick superficial inspection shows that this harness might be in very good condition indeed!


Then, at the end of one of the afternoons, and for no apparent reason, I decided to have go at removing the front windscreen surround trim. I started with the left hand side, working from the lower corner upwards. Using the blue plastic tool together with the red handled chisel (pictured below) I managed to get a foothold on the lower section. From there I slowly worked upwards, using the plastic tool between screen and trim and the chisel between trim and screen surround. But getting up towards the top corner the progress halted. So I switch to the section above the centre of the windscreen. And after about 15 minutes of carefully levering at the trim surround, it came off.
Next I tackled the right hand side. And with the (re)gained experience, that came of within minutes. But while working on that surround trim part, I noticed that the whole screen was moving slightly. Lifting it gently from the right hand side, showed that it was only held in place on the left hand side wind screen pillar. And after some gentle persuasion that side came free of the wind screen surround too. An unexpected quick and easy result! Glad I can add another front screen to my stock of spare front screens, as with current drivers attitudes they are easily damaged!


Also managed to drain the fuel tank, cooling system and brakes. And disconnect the engine completely and remove the radiator. Only the exhaust is still in place and connected to the engine.


Remains a short study of the amount of tin worm that this car’s body houses. Or damage (rust) assessment so far!

The inside of the driver’s side, of the lower wind screen surround.
No visible rust on the outside of the wind screen surround though, which is good!

Cosy mouse nest hidden behind the blanking plate for the wiper mechanism.
But after vacuuming the area it turned out to be in fairly good condition,
be it with a large amount of heavy surface rust;

The area with the most rust of the car. The sill at the front isn’t too bad though.
And it is clear to see that repairs have been carried out before.

A close up of the rot in the driver’s foot well floor.
After poking around with the handle of a screw driver

The passenger foot well is solid. Though on this side there is also a repair panel welded in.
Hopefully it was done properly as the battery tray is on the other side!

Final tasks, before passing it on, will be the removal of the gearbox and back axle. They are low mileage according to the odometer, as it reads only 87173 kilometres. And the seats didn't look too worn! So the mileage seems to be correct.

Monday, 3 February 2014

FHC resto nr. 3; 3 days into the project


After removing the engine and gearbox last Wednesday and the wind screen last Saturday, I am now three days into dismantling the car and it is completely bare now. Except for the suspension that is. I left that in place to make moving the car around easier. But not before all nuts and bolts were loosened, just to make sure they can be removed easily when needed.

So far no real horrors turned up although removing the bulkhead insulation  showed what I already expected, some rot in the seams between the front inner wings and bulkhead. But not as much as I had expected ...


Then there are some patched repairs to the front inner wings. And as there are some signs of (surface?) rust on the front of the sills behind the front wings, these will have to come of to make sure everything is Ok underneath. And although this is a fair amount of work, the added bonus is that the seams between inner and outer wing (which are rather prone to rot) can be dealt with properly.


The transmission tunnel has been butchered even more to accommodate the Sprint gearbox ...


And the PO managed to tear of one of the front tow eyes and damage the cross member between the front of the chassis legs ...


And while removing the gearbox and noticing all the adaptations needed to get the Sprint gearbox fitted properly, I have decided to ditch the idea of using Sprint 'box in favour of a LT77 'box. This decision is prompted by the fact that the car will be built as TR7 Sprint, with a standard spec Sprint engine on twin SU's.
Talking of engines, the original engine that came out will only be used after it has been completely stripped and thoroughly cleaned. There is evidence that the coolant system is clogged up quite badly. As this temperature sensor the PO fitted into the lower radiator hose clearly shows ...


And although a few bits and pieces did put up something resembling a fight. Like the straps holding the fuel tank in place. The bolts were rusted solid to the straps, but that was dealt with accordingly using brute force. The 4 special bolts were all saved but the straps are scrap now. But despite that very pleased to say the tank came out unscathed and looks brand new.
And of course the wind screen. In the past I have tried all sorts of special tools but while removing the screen from the DHC some 5 years ago we found out that a simple penknife and perseverance works best. And indeed after a few hours of gently cutting away at the sealant I was able to remove the wind screen intact leaving me with a very bare car ...


While working my way to the front of the car so far I found some evidence that somewhere in the past this car was re-shelled, probably using an early US spec shell. First there are clear markings on the right hand front suspension turret suggesting the original VIN number has been removed. Then there are two small holes in the left hand wind screen pillar which are a perfect match for the little alloy VIN number plates as used on US market cars.

Saturday, 5 June 2010

DHC report nr. 97; First drive

Yesterday, with the front screen’s sealant fully cured, I fitted the lower wind screen finisher and the wipers. Should have been a quick one but the nut from the right hand wheel box put up quite a fight. Took me well over an hour and a half to fit the nuts. After that the wiper arms were easy indeed.


Final job was fitting a new battery and connecting it up, she was ready for her first outing. And this afternoon the car left the shed under her own power for the first time in just over 17 months. As the car officially isn’t roadworthy without an MOT, I decided not to venture to far from home. Luckily there are enough interesting roads within a 10 mile radius for a gentle shake down run.
Really nothing much that was wrong. Only the coolant warning light refuses to go out, and after about 50 kilometres she developed a slight knocking under (hard) braking. But I am not too worried about that, as going over all suspension nuts and bolts was planned for tomorrow afternoon.
Other thing that needs some attention is the alternator, which looks like it’s on its way out. Near the end of the test drive I noticed that the indicators were only working very slowly. A quick look at the voltage gauge learned that the alternator was only charging marginally. So I will have to use the alternator from ‘t Kreng to get the car to the MOT and order a new one.

Safe for these few problem the test drive was rather good fun. This together with the fine weather made me forget that the car isn’t road legal yet. It was a rather enjoyable afternoon. And most importantly she looks absolutely gorgeous in the bright sunlight ...


With the car back in the shed I carried out a few more checks, but no real problems. Still a small leak at the front of the rocker cover. Turned out that I hadn’t tightened one of the screws properly. Also had a look at the wind screen washer which didn’t work. But after filling the hose with water that problem was solved, clearly the pump isn’t self-priming.
Will see if there are any other things that pop up tomorrow afternoon ...