Showing posts with label Brakes. Show all posts

Wednesday, 3 September 2025

FHC resto nr. 171; A few rectifications


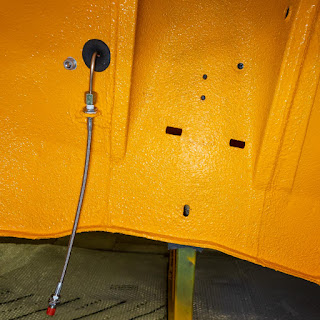
It’s six months since I last worked on the ’76 car. And as you can read in my blog, there are several reasons for this: ‘t Kreng's water pump, the work on the DHC, and my regular work of course. But with a few weeks holiday ahead of me I decided it would be nice if I could finish the rear of the car’s interior. Time to pull the cover of the car and start to work. But first there were a few (small) jobs that needed rectifying. Starting with the mounting hardware for the brake balance pressure reducing valve. While fitting the steering column I found out I had used the wrong bolt to fit the valve. It was the bolt for the column’s G-clamp, which is longer than the one for the valve. As I had prepared only one bolt of the correct length it was taken from the valve and used on the steering column. But that meant I needed to prepare new fasteners for the valve. Luckily I had a few rusty spares lying around. And with the help of a friend’s blasting cabinet, a blow torch and a small container filled with oil, it was blackened and fitted. Looks quite nice.


Next job that needed rectifying were four small holes in the cabin floor. These needed their rubber plugs fitted. Something I forgot when I fitted the sound deadening pads almost 10 years ago. First Idea was to just open up the holes and insert the blanking plugs. But that didn’t work. The combination of the steel panel, the underbody protection and the sound deadening pads was too thick to fit the blanking plugs. Time to borrow a professional (and very sharp) hollow punch set from a friend to remove the sound deadening pads around the holes. These punches are designed to cut through material when hit with a (big) hammer. Not a good idea on steel panels. But being very sharp punches, they could cut through the sound deadening by simply pushing and turning them through the sound deadening pads. This way a ring was cut loose from the sound deadening pads. And this remaining ring could then be removed quite easily using a pen knife and a small sharp screw driver. And this removed enough material for the blanking plugs to be fitted. Some clear wax oil was used for rust protection.


The last correction concerned the carpet over the transmission tunnel. When I fitted it over the 2024 Christmas period, I wasn’t impressed in the way the carpet ballooned coming down from the top of the transmission tunnel. So I decided to use some fancy high strength “gecko” tape to glue the carpet to the top and the sides of the transmission tunnel. And this worked very well. And it enabled me to perforate the carpet to fit the plastic carpet protector and the mounting bolts for the seats.


The last tasks for this productive afternoon were the preparations for mounting the parcel shelf. A job I've been putting off for a while now, because I'm afraid I'll make a mistake with the dimensions for the holes I need to drill. Measure three times, drill once! The fact that the guy who covered the parcel shelf has died since he delivered this quite nice job, didn’t help! Also checked and corrected the sound deadening panel I made and which fits between the parcel shelf and the rear window. More on that later!


Sunday, 17 August 2025

More TLC for ‘t Kreng


Part two of the general service and maintenance check of ‘t Kreng, which was carried out over this weekend. With the most important job being flushing and bleeding the hydraulic fluids. From a mileage point of view this wasn’t really necessary. But both clutch and brake fluid were well over three years old. Where my normal interval for these fluids is two years. So time to call on the help of a friend for a traditional flushing and bleeding session!
Starting with emptying and cleaning the clutch cylinder’s reservoir. And this immediately showed why regular hydraulic fluid changes are absolutely essential. The fluid I sucked out of the clutch cylinder’s reservoir was almost completely black. Forgot to take the picture but the one in this earlier post gives a good indication on how it looked! After that the reservoir was cleaned and filled was fresh brake fluid (Bosch DOT4). Flushing and bleeding the clutch system was left till later though.


We moved to the brake system instead. Starting with the removal of the brake master cylinder’s pressure failure switch. Always tricky as this one is by now old and brittle. But I succeeded to remove it intact. Probably helped by the anti-seize paste I used when I re-fitted it a few years ago.


With that hurdle successfully out of the way, we could start flushing and bleeding the brake system. Starting with the front brakes which are fed through the rear chamber of the fluid reservoir. This chamber was also first emptied with a small manual suction pump, after which it was filled with fresh fluid. And the flushing/and bleeding could begin, starting with the front calliper on the right hand side. For both sides together, we used twice the contents of the rear chamber. No air came out.


As the reservoir’s front chamber can’t be emptied with my simple pump (a large syringe type affair) we had to empty this chamber by pumping the brake pedal with one of the bleed nipples at the rear open. My assistant was a bit overzealous though, emptying the front chamber too far. Which resulted in some air being drawn into the system. Luckily the air could be bled very easily though one of the two bleed nipples at the back.


Next job was flushing the clutch system. With the reservoir filled with fresh fluid, and the old fluid still in the pipe, it should be clearly visible when all the old fluid was expelled from the system. It was! But just to be sure all the old fluid was expelled, the contents of a full reservoir were flushed through the system after clean fluid came out of the master cylinder. Job done! Actually the biggest problem here was removing the rubber dust cap from the slave cylinder’s bleed nipple underneath the car! It had collected some oil, resulting in a rather slippery dust cap.


Next on the to-do-list where the wheels. They would certainly benefit from a good clean. Rather straightforward with warm soapy water and a collection of different brushes. I did need a shower afterwards!


Final job on the on the to do list was cleaning the two earth points behind the head lamp mounting panel. Hardly any oxidation there, only a lot of paint. So I cleaned away the paint around the mounting points and refitted the earth points using some copper slip to prevent future corrosion.


And the final job for the day was cleaning the steering wheel and treating it with a leather conditioner. The lack of use in the recent years had dried out the steering wheel’s leather cover. And after well over thirty years of service (it started life with me when I fitted it to a Mini Cooper, in 1994!), it could do with some tender loving care. It did soak up quite a bit of leather conditioner fluid.


Wednesday, 31 May 2023

FHC resto nr. 149; Various smaller jobs


Over the past weekend I have been using the fine weather as an excuse to work on the FHC. It were mainly small jobs like cleaning the sound insulation pads for the parcel shelf (YKC3632) and rear bulkhead (YKC1609). Nothing glamorous, but good to kill a few spare hours. Especially the ageing adhesive residue of the tape used to hang the bulkhead pad from the parcel shelf pad was a pain to remove. But white spirit, an old rag and a fair amount of elbow grease solved this. And yes I forgot I had a bottle of special glue removal hidden away somewhere. Only ran into it when I had finished this job! Though it didn’t have an impact on the end result.

The parcel shelf pad (YKC3632) before

And after cleaning

The rear bulkhead pad (YKC1609) after cleaning

And with the two pads cleaned they could be fitted to the car. Sadly the third pad (WKC3340) was attacked by mice, so that isn’t quite up to my standards to be re-used. That is one that will be addressed somewhere in the future!


Another area that got some attention was the brake master cylinder and the ignition coil. The brake failure switch got a quick health check and a cleaning job. After which it could be fitted and wired up together with the coil. If in doubt; the White/Yellow wire goes to the coil’s + terminal and the White/Slate wire to the – terminal.


And sticking with the wiring, I added some extra wires that were deleted on later cars; the wires for the roof mounted interior light. I managed to salvage part of these wires from the cars original wiring harness;


But that wasn’t long enough to reach the A-post on the passenger side. But I did have a few meters of the
correctly colour coded wires in stock to adapt the later door harnesses for a roof mounted interior light. And with my trusty crimping tool adding the appropriate length was easy. Next job will be refurbishing and adapting the passenger door harness.
And to finish this post; I sorted all spring clips etcetera that I might need while fitting the car’s interior;


Sunday, 19 March 2023

Servicing ‘t Kreng

With the spring in the air and the “driving-season” about to start, it was time for a long postponed job: Changing the hydraulic fluids in ‘t Kreng. It was the first time I did this job in the shed. And it was a bit of a squeeze with all the TR7’s inside!


As for the job itself, that is something I usually do every two years. Though this time it was almost three years since the hydraulic systems last fluid change. Mainly caused by the lack of use, as a result of which the fluids didn’t look to bad once drained from the system.
And with the proven two man bleeding method it didn’t take long to get the systems flushed and bled. Discussing the other two projects in the shed took more time 😊


This also meant I had to return this Sunday morning to finish a few smaller job. Like re-installing the brake failure switch, cleaning the wheels, and checking the tyre’s pressures.


Turned out the tyre’s pressures had dropped about 0,2 bar over the past 11 months (from 2,10 to 1,90 bar). So nothing to worry about. The same applied for the engine fluids. A gentle drive to wake her from her 11 month slumber is the next item in my TR7 scheduler.

Sunday, 28 August 2022

Almost ready for the 10CR


Again managed to spent a few hours tinkering on the drophead over the weekend. This time the front suspension and brakes got some attention. I had some hopes I would find something explaining the still rather long brake pedal travel. It wasn’t to be. Though a drive with the car last week showed the brakes were at least consistent. So that should rule out air in the system (actually the system was flushed and bled less than 1000 kilometres ago). Also no discernible play in the bearings that could cause pad knock-back. Which was hardly surprising after her recent MOT pass!


And the Mintex M1144 pads still have more than enough life left in them for the oncoming almost 3000 kilometres off the 10 Countries Run in just over a week’s time.


Actually the only thing that needed rectification was a slightly loose lock nut for the left hand steering rod end. Though I will have the tracking checked later in the week just to be sure.
And for peace of mind I disconnected the handbrake cable from the rear drums and gave the brake pedal a few hefty pushes in an attempt to get the brakes shoes out a bit more. Don’t expect too much of it but who knows!

Saturday, 6 August 2022

Pré 10CR check DHC


Spent most of this Saturday’s afternoon on another check for the car of choice for next month’s 10 Countries Run. First area to get some attention were the rear brakes. Because the brake pedal’s travel is still to long for my liking. The drums where a nice tight fit over the brake shoes, with no ridge.


Of course hardly surprising as they were machined in 2019. And after that the car wasn’t used as much as I would have liked due to the Covid pandemic. But despite the lack of use the handbrake adjusters were still free and working properly. And no sign of leaks from the 5 year old rear brake cylinders.


With a clean bill of health for the rear brakes, it was time for a rather simple but also important job. Checking the valve clearances. And about time these were checked. The last time I checked and adjusted them was in 2007, when the engine was in the Bordeaux red DHC.

Rather pleased with the condition under the cam cover. Especially considering this engine has been in use since 1994. It is actually the first car engine I built myself!


And 15 years and 44.531 kilometres on I found the clearances weren’t too bad. One spot on, five less than 0,05mm to tight, one between 0,05 and 0,10mm to tight and one 0,05mm to wide. While typing these words I have still not decided whether to adjust them or not ... To be continued!


Sunday, 22 May 2022

Servicing ‘t Kreng


Over the past week or so I managed to spent some time on ‘t Kreng. Main job was a pre MOT check and a service, starting with the dry bits at the back of the car. No real horrors there. All the back axle needed was a clean and some grease on the hand brake mechanism. It was so uneventful that I even forgot the pictures!
A problem I didn’t have with the next job, cleaning and lubricating the Weber’s throttle mechanism. As this is mounted underneath the rear carburettor it is almost completely hidden from view. Which makes removal a bit of a trial and error job. Unless you use the modern equivalent to the inspection mirror: the smartphone’s camera.


And this clearly showed that it’d be best to remove the complete air filter assembly plus inlet trumpets from the rear carburettor. It also showed that it would be best to leave the mechanism’s mounting plate attached to the bottom of the carburettor.


Removal of the mechanism revealed no hidden horrors, though the lever arms pivot axle did show light wear marks. But that should be good for a fair few years of service. Also used the opportunity to remove some slack from the throttle cable
And of course with any check of a TR7 engine bay, a close look at the water pump area is high on the to do list. The outcome was as expected. The infamous hole underneath the water pump was completely dry.


As can be seen in the picture above there (still or again) is a small leak from the connecting tube (UKC2538) between inlet manifold and water pump cover. I have been trying to ignore this leak for well over 5 years now and it has often solved itself after some use of the car. Will see how it develops over the coming weeks or months!


Next job for this part of the car’s service was an inspection of the front bearings and brakes. Starting with the bearings. Turned out the left hand front bearing needed a tiny amount of adjustment. As there was no discernible noise, I just tightened the nut a little.


Final job was a good clean of the inside of the wheel arches. It always amazes me how much dirt and soil can be collected here. Especially on top of the brilliantly (not!) placed L-shaped profiles between the inner wings and the strut towers.


Saturday, 8 January 2022

FHC resto nr. 138; Brake pipes part 6

And the final part I dare say! Yesterday I had to pay one more visit to my local brake specialist. To collect yet another brake pipe and a small handheld flaring tool. The last item was necessary as I decided I would use the original holes in the nose panel. And as such I would be working without the correct template pipe. But by using my late template pipe, the drawings from my parts manuals and the car itself as template, I was able to create a new pipe. Though this time I had to do most of the shaping in the shed.


With this last hurdle taken it was at last time to fit the brake pipes to the car. But not before I had to spent some more time searching. For the braided flexible brake hoses this time. Luckily this time the search lasted only 5 minutes!


And that left me with the final job. Fitting them to the car. This time there were no more problems. Even my first attempt at using a flaring tool went well!

RKC1033 (PRV to back axle):


RKC1005 (PRV to LH front strut)
& RKC1007 (PRV to RH front strut):


Flexible hoses:


All pipes turned out to be fairly spot on. Though they all needed some on the spot tweaking to get a near perfect fit. Rather pleased with the result. And I now have regained some experience to tackle the final one; the fuel pipe.