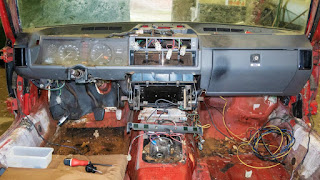
The disassembly of the parts donor is going
pretty well. Mainly because I was able to spent a few hours in the shed in the
days before Christmas.
I started with the dashboard assembly. As most
of the interior had been removed already, this was pretty easy. And here I
started with the instrument upper roll. Which is obvious of course. All screws
came off without any drama, as did the roll itself.
Next in line was the instrument panel. Here I
first removed all the screws holding it place, so it could be pulled up a bit
to gain better access to all connectors at the back. And with everything
disconnected, the instrument panel could be retrieved from the car.
After which removal of the facia was very
straight forward indeed. At this stage it started to become clear that
the main wiring harness is in pretty good condition. So far the only adaptation
I found was one “fire starter”, or Scotchlok connector as they are also known.
Though the amount of added wires I collected in the passenger foot well might
suggest something different!
Final task for the interior was the removal of
all the remaining wiring. But for that I also had to disconnect a few wires in
the engine bay. Here I encountered a completely new problem. There were so many
leaves in there that it was impossible to find most of the connectors. Luckily
I had a large vacuum cleaner at hand. After all the leaves and small branches were
removed, I was able to access all the wiring connectors in the engine bay and
disconnect them. Followed by the same action for the nose of the car:
With that sorted I was able to gently pull back
the wiring harness into the cars cabin:
And from there remove it entirely from the car.
I might well change my plans for the ’76 car now. As a quick superficial
inspection shows that this harness might be in very good condition indeed!
Then, at the end of one of the afternoons, and for
no apparent reason, I decided to have go at removing the front windscreen
surround trim. I started with the left hand side, working from the lower corner
upwards. Using the blue plastic tool together with the red handled chisel
(pictured below) I managed to get a foothold on the lower section. From there I
slowly worked upwards, using the plastic tool between screen and trim and the
chisel between trim and screen surround. But getting up towards the top corner the
progress halted. So I switch to the section above the centre of the windscreen.
And after about 15 minutes of carefully levering at the trim surround, it came
off.
Next I tackled the right hand side. And with
the (re)gained experience, that came of within minutes. But while working on that
surround trim part, I noticed that the whole screen was moving slightly.
Lifting it gently from the right hand side, showed that it was only held in
place on the left hand side wind screen pillar. And after some gentle
persuasion that side came free of the wind screen surround too. An unexpected quick
and easy result! Glad I can add another front screen to my stock of spare front
screens, as with current drivers attitudes they are easily damaged!
Also managed to drain the fuel tank, cooling system
and brakes. And disconnect the engine completely and remove the radiator. Only the
exhaust is still in place and connected to the engine.
Remains a short study of the amount of tin worm
that this car’s body houses. Or damage (rust) assessment so far!
The inside of the driver’s side, of the lower
wind screen surround.
No visible rust on the outside of the wind screen
surround though, which is good!
Cosy mouse nest hidden behind the blanking
plate for the wiper mechanism.
But after vacuuming the area it turned out to be
in fairly good condition,
be it with a large amount of heavy surface rust;
The area with the most rust of the car. The
sill at the front isn’t too bad though.
And it is clear to see that repairs have
been carried out before.
A close up of the rot in the driver’s foot well
floor.
After poking around with the handle of a screw driver
The passenger foot well is solid. Though on
this side there is also a repair panel welded in.
Hopefully it was done
properly as the battery tray is on the other side!
Final tasks, before passing it on, will be the
removal of the gearbox
and back axle. They are low mileage according to the odometer, as it reads only 87173 kilometres. And the seats didn't look too worn! So the mileage seems to be correct.


No comments:
Post a Comment