Sunday, 27 April 2025

A TR7 filled weekend

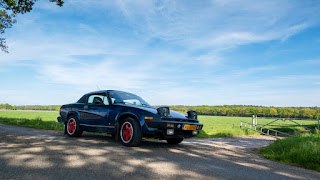
Last week I managed to fit the new water pump. And this weekend I found some time to fill ‘t Kreng’s coolant system. And after leaving it overnight I found no leaks. Looks like a result!


So the final job for the Sunday morning was refitting the carburettors and the strut brace. After which it was time for a short 50+ kilometres test drive. And the car certainly did her name proud. After only a few kilometres the Low Coolant warning light came on! As the temperature gauge wasn’t even at its normal working position I decided to ignore the light for the time being. And sure enough the light switched off again a few seconds later. And the temperature gauge rose to it’s normal working position and remained there for the rest of the drive.
As it already was late in the afternoon the roads were fairly quiet despite the glorious weather. Time to enjoy the fine spring weather and the car’s still razor sharp handling.


And when I returned home early in the evening the much dreaded check for any leaks. There was a slight hissing sound coming from the hose connecting the header tank with the radiator. As that hadn’t been touched during the work carried out over the past few weeks, and there was no visible leak, that was ignored. But there was a tiny trace of coolant from the weep hole underneath the water pump. See how that develops over the coming weeks!

Another job on a rather TR7 filled weekend was preparing my last spare body for transport over to the work shop next weekend. This body is rust free but has extensive and badly repaired accident damage to the left hand front of the car. So this body will supply the necessary parts that will be needed to repair the various rusty areas of my DHC.


Sunday, 20 April 2025

Fitting ‘t Kreng’s water pump


Two weeks ago I removed the water pump with the idea of reconditioning it again. But on closer inspection I found the new (after market) seal hadn't seated properly. This matched my hunch pretty well. So after exchanging some ideas with various people who should have knowledge on the subject, I decided to bite the bullet and go for a brand new water pump. And as these have become fairly expensive, I decided to also renew the water pump’s spindle bush. And with the correct tool, removing this bush should have been easy.


Sadly though that didn’t work. The available rim at the bottom of the bush was to thin the get enough grip on the bush, as a result the puller slipped through the bush constantly. And because of that the bush got damaged. As there was no way back it was time for a rethink and some appropriate brute force. Using an old reshaped screw driver as a cold chisel between the engine block and bush. It looked fairly crude and messy but it did the job without any damage to the block or the jack shaft. The bush did suffer though!


The remains of the original bush (#145022)

Halfway through the cleaning of the orifice for the spindle bush

After the bush was successfully removed and everything cleaned thoroughly it was time to fit the new bush. And with the aid of a small tool made from a damaged water pump axle and some lubrication, the bush could be gently tapped into position. At least that went quickly and without drama!


This also applied for the next job, fitting the water pump. Again all contact surfaces in the block and on the gears were lubricated. After which the pump slipped in without drama. I only had to help a little with a ring spanner on the impeller bolt (turned counter clockwise) to get the pump seated correctly.


Final jobs before the time ran out on Easter Sunday were measuring the required gasket thickness for the water pump cover, fit the cover and fit the inlet manifold. When I fitted the inlet manifold last year it felt like the threads of one of the mounting holes in the head was damaged. That's why I had mentally prepared myself for this job, and had a thread repair kit on hand. But I needn’t have worried. This time all (stainless) bolts went in without any problems!

Remain the final jobs for later in the coming week;
• Connect all hoses;
• Fill the system with coolant;
• Check for leaks;
• Refit the carburettors.


Sunday, 6 April 2025

‘t Kreng’s water pump

Or the never-ending story continues! The last few times I drove this car last year, there remained a noticeable coolant loss. And unfortunately the leakage did not diminish, it started to get slightly worse. So I decided to bite the bullet and remove the water pump to check the condition of all the seals. Time to get the spanners out again!


The biggest advantage of working on a water pump that was fitted not so long ago is that everything comes of very easily. Even the pump itself could be removed simply with a ring spanner, turning the pump clock wise. Which meant that within an hour and a half the water pump was out again.


And with the pump out it was time for a first superficial inspection. I had hoped something obvious was wrong but there wasn’t. So somewhere in the coming week I’ll have to visit a friend’s work shop to use his hydraulic press to remove the impeller and check all parts in more detail. To be continued!


Thursday, 3 April 2025

DHC repairs #9: The crusty bits


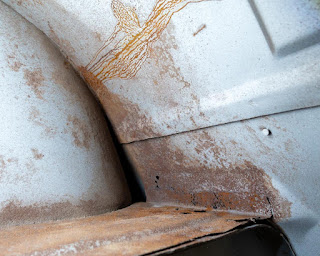
In the past week I was able to visit the work shop where the DHC’s bodyshell is currently residing. Main reason for the visit was dropping of most of the necessary panels for the body repairs. But also to inspect the body in more detail! Below is a small selection of the pictures I shot:

The crusty front section of the right hand sill.

The rear section of the right hand sill.

The right hand side rear suspension mounting points and floor section, showing signs of previous repairs.

The left hand side rear suspension mounting points and floor section.

The front section of the left hand sill and floor.

The right hand side rear valance.

Some local damage to the front of the spare wheel well.

Some rust holes probably caused by accumulated dirt on top of the right hand rear chassis leg.

Rust on the right hand side of the rear bulk head, in front of the right hand chassis leg.

Were the left hand rear chassis leg meets the rear bulk head.

Left rear suspension mounting points.

Hole in the rear light panel caused by contact corrosion between the mild steel of the body panel\
and a stainless mounting screw from the licence plate.

Corrosion in the front left hand inner wing.

Crusty edges of the left hand front wing.

The fairly solid inside of the left hand front wing.