Thursday, 31 December 2009

DHC report nr. 66; One year and slowly taking shape

The day before yesterday it was exactly one year ago that I started dismantling the DHC. Original plan was to do some body repairs (a little welding and removing lots of dents) and a complete new paint job. With the body of the car properly done, all other jobs could be done in the future, when the need for them arose. But pretty early in the project I realised that the work on the body would take longer. It turned out to be rather difficult to find decent craftsman, able enough (and willing) to do a proper job. So to kill some time while “headhunting”, I started cleaning and coating various bits of the car. So what started as a body only job, turned into a full restoration.

In the past year quite a lot of work has been carried out, which is illustrated quite nicely by the following two pictures, The first one taken exactly one year ago, the other is from today 😜


Over the past few day I have again busied myself with various little jobs that I am pulling forward as access to them is much easier now the body is still fairly bare. Like the screen washer pump and the ignition module and coil;


And the hinges for the boot lid;


But the emphasis in the past few days had been on the wiring loom. First the main loom was roughly put in place;


So I could connect the first of the earth points, you have to start somewhere;


After that I put the rear loom in. Thought this would be straightforward but it wasn’t. First of all it is fairly cold so the wires are pretty stiff, making it difficult to tape it down properly. But this was sorted with the by now trusty old paint stripper and a bit of duct-tape;


Biggest problem turned out to be the middle section of the rear loom. One way or another it’s just too long, and as it was rather stiff it proved to be difficult to put it “away” in a tidy manner. But even that got sorted in the end. I know you won’t see any of it ones the car is ready, but I just want to get it right. It took me longer than expected but I got to the boot in the end, to connect up the rear lights;


With the rear loom in place I switched to the door looms, in preparation for the doors to be fitted. While trying to fit these looms I found a new application for (long) cable ties. They are excellent to pull wiring through small inaccessible body holes, like those from interior light switches;


And to end the year René came over to help me with fitting the doors and the boot lid. Really starting to look like a car again. To be continued next year!


Monday, 28 December 2009

DHC report nr. 65; Several small jobs

In between other commitments I have been doing several smaller jobs on the car over the past week. First I thought it a good idea to fit some extra sound proofing to the sills (they sounded quite hollow while working on the car).


After that I switched to the front of the car to make some room in the storage cupboard, so I fitted the header tank and the two grill mouldings. With the grill I encountered a small problem, it wouldn’t fit at the right hand front corner. Then I remembered that I did have some problems whilst removing it nearly a year ago. Sadly I didn’t think much of it than, but I should have. In the end the only solution was to grind a bit from the top of the corner from the RH moulding, after which it fitted perfectly;


With Christmas over I returned to the car today to do some work on the underside, fitting the fuel pipe which I prepared last week;


And fitting the rear lights, a nice period antenna, licence plate, fuel filler blanking plate and tow bar;

Tuesday, 22 December 2009

DHC report nr. 64; Start on the interior

Phoning around for new pedal bushes didn’t turn up anything in the short term. So I had a browse through my spare parts and found two fairly good and complete pedal boxes, which I dismantled to retrieve the bushes. Sounds easier than it actually was, but I managed to get four good bushes out. With the bushes sorted and to prevent any problems with refitting everything, I machined one end of the pedal’s shaft to the same diameter as the shaft itself. And with these little, but rather time-consuming jobs done, reassembly of the pedal box was pretty straightforward.

As the outside temperature was rising above freezing, I went over to the shed this afternoon to start on the re-assembly. As it still was too cold to fit the plastic clips for the fuel pipe (they break easily) I switched to the interior.

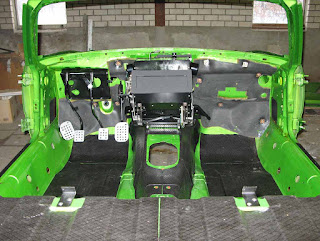
First thing to do was put the bulk-head sound proofing back in place. Despite a good clean they still look a bit shabby, but at least they are undamaged by moisture or rusty panels. Fitting the sound proofing showed me something else though. It is about time that I get going, because I start to forget where I stored certain parts ... very frustrating. But found them in the end!

Before moving on to the spannering I had a go at inserting the steering shaft’s lower bush in the bulk head. Usually pretty straight forward, but as the (poly)bush was rather stiff due to the cold weather it did put up a bit of a fight. Which it lost after I attacked it with the electric paint stripper and warmed it up a bit!

After this, at last, I could get the spanners out and start with bolting the car together. Spent a few rewarding hours on the “A” post blanking plates, footrest, pedal box and accelerator pedal;


Followed by the heater unit;


This one also put up a bit of a fight, mainly caused by the fact that the new seals I made are slightly thicker to give a better seal. But after 15 minutes of fiddling, adjusting and repositioning the heater it was fixed to the bulkhead. Well pleased with the way the foam rubber seal around the coolant pipes fits.


With the heater mounted to the bulkhead I climbed inside the car to mount it to the transmission tunnel. Rather straightforward but with all the bolts and nuts tightened up, I found out that the flap to direct air to the foot wells of the car couldn’t be opened .... bugger !!!
Reminded me of the problems I had a few years ago while preparing the car for the 10CR. Indeed the problem was the same, the flap was obstructed (just) by the bracket on which the heater sits. Luckily the mounting brackets at the front of the heater (so facing the rear of the car) have some room for adjustment. After some adjustments the flap now opens and closes very smoothly. Only the (dashboard) lever for the fresh air flap does need a bit of extra lubrication. But that is for another day;

Sunday, 20 December 2009

DHC report nr. 63; Pedal woes

As it is rather wintery over here at the moment, with night time temperatures dropping below -10°C and light frost during the day I won’t be working much on the car itself. Luckily I do have a few parts lying ready to be assembled, which I can do at home or in the heated workshop.

As I received the pedal extensions a few days ago I thought it a good idea to start assembling the accelerator pedal and the pedal box. All the parts of which had been coated or cleaned, ready for assembly. First thing to do was fit the alloy extensions to the pedals;


And the footrest. I had ordered an alloy competition footrest, but that turned out a bit too large for my liking, so that will be used in ‘t Kreng. Which means I nicked the alloy extension plate from that car to use in the DHC;


As the extension I fitted to the accelerator pedal some 15 years ago was quite worn and damaged over the years, I fitted a new one. With the extensions fitted I started on the re-assembly. First one was the accelerator pedal;


After which I switched my attention to the next and last job for the day, the pedal box. Trial fitting the pedal shaft to the box and the clutch pedal didn’t reveal any problems. Only that the front of the shaft was very tight inside the pedal bush. Didn’t think much about it until I tried the brake pedal. After a few taps with the hammer I felt something was not as it should be, which was correct! One of the pedal’s bearing bushes had been damaged;


First I thought this was caused by some of the powder coating that I might have overlooked on the bushes’ surface. But after a closer inspection of all the parts I found out that the ends of the pedals' shaft (on the outside of the circlip groove) have a 0,4mm larger diameter then the rest of the shaft.


Haven’t got a clue as to why Leyland/Triumph machined them this way. So I’ll have to order some new bushes and wait for them to arrive before I can finish the pedal box. Gives me the chance to machine one end of the shaft to the same diameter as the rest of it. Should make assembly a bit easier!

Sunday, 13 December 2009

New alternator for ‘t Kreng

Most of the time during this year’s Le Carrera Caledonia, and the holiday on Skye after that, we were accompanied by some screeching noises. We pretty soon found out that the bearing from the alternator was pretty worn. But as I don’t carry much spare parts with me, we could only hope it would hold out till we got back home. Which it did.
As the car wasn’t used much after I didn’t pay much attention to the alternator. But I was reminded of the worn bearing while testing the car in September for a night time reconnaissance run for our “Nachtrit”. With a 6 hour drive in the dark through the Belgium Ardennes coming up I thought it wise to change the shod alternator. Luckily I had a spare lying in the attic, which I fitted.


This unit was removed from the DHC a few years ago in preparation for the 2007 edition of the 10CR. As I didn’t know its condition, and with more than 2000 miles in a few days ahead, I decided to put a new one in the car and keep the old unit as a spare. But it should be fine for a few shorter trips.

On the first renaissance run the alternator behaved quite well, but it was a bit noisy. But during the final check, on the day of the event, it started to play up, making funny noises and sometimes not charging properly. So in the week after the event I went over to a friend’s workshop to order a new one. Forgot to ask what make it is, but as they are a Bosch dealer it will be probably be a Bosch unit. Good thing about it is that it delivers 70A instead of the 45A from the old unit. When I first saw it I did have some doubts if it would fit properly but the mechanic helping me ensured it would be a straight swap.

As I have been busy with the DHC since, I haven’t had the time or the mind to put the new alternator in. Luckily I woke up pretty early this morning and as the sun was shining straight under the car port where ‘t Kreng is parked, I thought it a good idea to put the new alternator in. As usual with this kind of simple jobs you expect something to go wrong, but not this time. So in no time at all the old unit was out, giving me the opportunity to compare the two units;


The differences between the two units are pretty obvious. And it turned out the mechanic was right, it fitted without problem.


Test drive hopefully after next week when I have a two weeks holiday. But I think that most of those two weeks will be spend at the re-assembly of the DHC.

Saturday, 12 December 2009

DHC report nr. 62; Fitting fuel tank

Started on the re-assembly today. First I fitted the fuel tank. Despite the fact the fuel tank is fairly accessible on a TR7 when the axle isn’t under the car, I opted to fit all pipes and hoses before fitting the tank.


This saves a few bruised and grazed knuckles while trying to connect everything afterwards. It makes the actual fitting only slightly more difficult, so definitely worth the effort. So with everything connected it was time to put the tank in place. All went fairly smoothly and the tank was in place in no time at all, despite the fact I had to do it single handed. Just a matter of hooking the tanks left hand seam over the rear chassis rail and hooking the filler pipe into its designed hole. With the tank thus hung up I had both my hands free to put the two straps in place, align the tank and tighten up the nuts.


With the tank safely in place it was time to secure the fuel filler pipe. First I inspected the hoses were all free from the body work, which they were.


But when I wanted to fit the plastic surround I encountered a small snag. It turned out that the surround had been deformed rather badly. As a result the rim at the top wasn’t flush with the rear panel, but sitting about a millimetre to high . But with the help of the electric paint stripper I heated it up a bit so I could bring it back to its original shape, giving a proper flush fit.


As it was still rather early in the afternoon I carried on with a few small jobs, like fitting the rear wing blanking pieces, sill kick plates and new plug-in nuts (in this case they are 7mm Ford items, sourced through my friendly ex-Leyland garage). And I found some time last week to trial fit these window winders in ‘t Kreng;


Also thanks to the friendly ex-Leyland garage who hadn’t a better use for them. They are labelled as being for a Lotus Exige but actually are standard Austin Rover Items. And the good news is they do fit in a TR7.

Saturday, 5 December 2009

DHC report nr. 61; More sound proofing

Finished fitting the sound proofing pads in the interior today. “Only” bit left to do was the transmission tunnel. As it has a somewhat irregular shape, I presumed it would be rather time consuming cutting the pads in the proper shape. This time my presumption was correct. And it was made worse by the fact that I only had just enough pads left, to cover the tunnel. So it was a nice puzzle on how to cut them with the minimal loss of material. Luckily I still had a fair amount of paper sheets left to cut templates and trial fit them. All in all it took me the whole of the afternoon to get the pads in place, shame they’ll be hidden from view underneath the carpet;


And found some time to fit the front spoiler;


And to finish the day I cleaned up the threads from the welded-on nuts and fit the mounting bolts for the fuel tank;


Next job will be fitting the fuel tank, followed by the fuel and brake lines.

Wednesday, 2 December 2009

DHC report nr. 60; Sound proofing

Started on the soundproofing of the car last weekend. First thing I did was acquire some thick paper sheets with the same dimensions as the sound proofing pads. From these I made templates which in turn were used to cut the soundproofing pads in the required pattern. I had scheduled that it would take me a fair few hours but it was actual a piece of cake. In just over an hour I not only had the templates ready but also cut all the pads, except the pads for the transmission tunnel. Due to the more complex form I thought it a good idea to first get some experience with the fitting of the already cut pads, before committing myself to these.

Tonight I fitted the pads. As usually I ignored the instructions that came with the pads (apply between 15 and 40ºC and don’t apply heat). The guys from the body shop that supplied the pads, advised me to use an electric paint stripper, which I did, and it worked perfectly.
I hoped it wouldn’t take me more than an hour to do, but it turned out to be slightly more time consuming. But after three hours of steady progress all the pre-cut pads were in place. Despite the fact, that it took a fair bit longer to fit the pads than planned, it was a rather rewarding evenings work.

The spare wheel well;


Inside of the right hand rear wing;


Rear bulk head panel;


Left hand floor area;


This weekend I hope to finish the soundproofing. Which means that the moment I can start with the re-assembly is slowly but surely drawing near!