Phoning around for new pedal bushes didn’t turn up anything in the short term. So I had a browse through my spare parts and found two fairly good and complete pedal boxes, which I dismantled to retrieve the bushes. Sounds easier than it actually was, but I managed to get four good bushes out. With the bushes sorted and to prevent any problems with refitting everything, I machined one end of the pedal’s shaft to the same diameter as the shaft itself. And with these little, but rather time-consuming jobs done, reassembly of the pedal box was pretty straightforward.
As the outside temperature was rising above freezing, I went over to the shed this afternoon to start on the re-assembly. As it still was too cold to fit the plastic clips for the fuel pipe (they break easily) I switched to the interior.
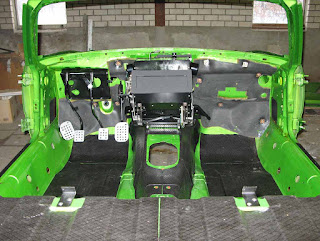
First thing to do was put the bulk-head sound proofing back in place. Despite a good clean they still look a bit shabby, but at least they are undamaged by moisture or rusty panels. Fitting the sound proofing showed me something else though. It is about time that I get going, because I start to forget where I stored certain parts ... very frustrating. But found them in the end!
Before moving on to the spannering I had a go at inserting the steering shaft’s lower bush in the bulk head. Usually pretty straight forward, but as the (poly)bush was rather stiff due to the cold weather it did put up a bit of a fight. Which it lost after I attacked it with the electric paint stripper and warmed it up a bit!
After this, at last, I could get the spanners out and start with bolting the car together. Spent a few rewarding hours on the “A” post blanking plates, footrest, pedal box and accelerator pedal;

Followed by the heater unit;


This one also put up a bit of a fight, mainly caused by the fact that the new seals I made are slightly thicker to give a better seal. But after 15 minutes of fiddling, adjusting and repositioning the heater it was fixed to the bulkhead. Well pleased with the way the foam rubber seal around the coolant pipes fits.

With the heater mounted to the bulkhead I climbed inside the car to mount it to the transmission tunnel. Rather straightforward but with all the bolts and nuts tightened up, I found out that the flap to direct air to the foot wells of the car couldn’t be opened .... bugger !!!
Reminded me of the problems I had a few years ago while preparing the car for the 10CR. Indeed the problem was the same, the flap was obstructed (just) by the bracket on which the heater sits. Luckily the mounting brackets at the front of the heater (so facing the rear of the car) have some room for adjustment. After some adjustments the flap now opens and closes very smoothly. Only the (dashboard) lever for the fresh air flap does need a bit of extra lubrication. But that is for another day;

No comments:
Post a Comment