Sunday, 21 February 2021

Coolant leak DHC


Or preparing the car for the first drive of the year! As the weather forecast for the weekend was very nice, I decided that one of the jobs for the Saturday was a check-up for the DHC. It turned out all fluid levels were OK, though the dip stick might tell a different story.


But it is the dip stick from a Dolomite 1850. In the past I checked the exact level by filling the sump with the exact amount of oil. And with this in the sump, the level was halfway between the tip and the low level mark. In other words the oil level was almost at the maximum mark.
The coolant level also was nearly at its maximum level. But when I checked for signs of leaks underneath the engine I found a small puddle of coolant sitting on top of the sub frame. As it was sitting right underneath the water pump, that was where I started the search. But the infamous hole was bone dry.


The same applied for the other regular leakage point, the connector pipe between the inlet manifold and the water pump cover. Everything was dry there too. Also the joint between the waterpump cover and the block showed no leaks. This only left one option. The top of the hose that goes from the water pump cover to the radiator. And sure enough, there was coolant on the back of this hose back. And on closer inspection I found this originated from the top of the hose. It turned out the jubilee clip pictured above had become a little lose. Quite easy to rectify!


The final jobs were topping up the oil in the carburettor dampers and checking the tyre pressures. They were all at about 1,8 bar. So they needed a little extra air, as I run the tyres on this car at 2,0 bar on all four corners.


And this afternoon I was able to enjoy a glorious winters day with the hood down. Sadly all photogenic places were cramped with people, so only the one picture as proof.


It was nice to be out again in this car, and before I knew it, I was back in the shed with 165 kilometres added to the cars odometer. It was an afternoon well spent indeed!


Saturday, 13 February 2021

FHC resto nr. 122; Wiring harness entries


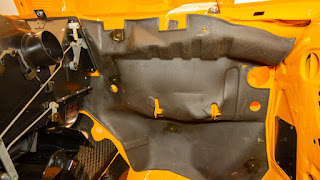
Last week I made the decision to use the complete late main harness from the parts donor. But that meant the current firewall feed-through opening for the harness needed widening from ø43mm to ø62mm This is to accommodate the larger rubber grommet of the later harness. Should have been easy with a hole saw or a step drill. Sadly I couldn’t use these as the centre for the enlarged hole was offset from the original hole. When I explained this to a friend, he advised me not to mess about and handed me this de-burring drill bit set.


Being Saturday, I loaded the tools in the Defender this afternoon, and went to the shed where I braved the cold. Fortunately, the sun was shining brightly and directly through the gate. So despite the outside temperatures being just below zero, the temperatures inside were comfortable enough to work. With all the tools inside the shed I started with moving the sound proofing out of the way and marking the outline of the new hole with a pencil. Sadly the much clearer felt tipped pen decided it didn’t like the cold! Next job was trying out which de-burring bit worked best, after which the fun could begin!


Biggest problem I encountered was the fact that I had to use a normal (battery powered) drill. So the rotation speed was on the low side. Resulting in a de-burring bit which was fighting me all the way. But it lost nevertheless. And well within the hour I had a nice large hole to feed the wiring harness through. It isn’t a perfect circle, but that fact will be completely hidden by the overlap of the rubber grommet! I also added an extra hole underneath (as per the later cars) to feed some extra wires into the engine bay. With a good quality step drill that was a job that only took a few minutes. After which the soundproofing could be put back in place (hairdryer came in handy!). But not before an extra hole was added and the iron filings had been removed.


With that job finally done I can now concentrate on the wiring harnesses. The plan is to have them ready when the warmer weather of spring arrives!
 

Sunday, 7 February 2021

FHC resto nr. 121; Choosing wiring harnesses part 2


Another of the plans that fell victim to the everlasting restoration of this early TR7. In the spring of last year I selected the main harness that was going to be used for this car. But then the parts car, I received from a friend late last year, intervened. And the wiring from that car looked to be even better than the one I had chosen before. So over the weekend I spent some time in the shed to check and compare the various wiring harnesses I had put aside for the ’76 car. And after an hour or so I was left with these harnesses that got my approval.


Pictured above is the main harness (PKC 1946), engine harness (RKC 5511), facia harness (RKC 4348), plus battery lead, battery earth and rear screen earth. And finally two door harnesses (TKC 3831). Though only one will be (partially) used as this car will get the early roof mounted interior light. But the passenger door will get a map reading light. So that is a part of the harness that will be used after some extra attention.
The gear box harness (UKC 9200) and the body harness (RKC 3630) are not shown above, as these have been prepared already. I even had a go at cleaning the various connectors somewhere last year, but forgot to make a mention here. For cleaning I used a solution of salt, dissolved in hot water and cleaning vinegar. After leaving the connectors in this solution for 15 to 20 minutes they were rinsed of with clean water. And finally dried in the bathroom, being the warmest and best vented room in the house!


Remains one final task before I commit myself to changing this car’s wiring to the later layout. And that is to make the decision if I am going to do a job I should  have done before painting the shell: Enlarging the hole in the firewall, through which the main harness passes into the engine bay. On this early car the diameter of the hole is approximately ø43mm:


But on the later cars from which I want to use the wiring harnesses, this hole measures approximately ø62mm:


I had hoped to get away with “just” using the earlier grommets for the passages through the bulkhead and into the front wing. But removing one from an old loom intact has proved to be impossible without butchering a complete loom. And with no guarantee that the grommets would survive fitting it to a different harness. So I have decided to enlarge this hole. Remains to find out how best to tackle this job. For that I will pick the brains of a few friends as soon as possible!
Another looming challenge are the different locations for the engine harness to exit the cabin. On the ’76 car this harness passes through a hole in the transmission tunnel.


Where on the later cars the engine harness passes through the bulkhead alongside the heater.


As these holes are pretty close together I hope I can use the original one. Maybe I have to adapt the engine loom a little for this. But that shouldn’t be too much of a challenge!

And to end this weekend I took my Defender out to play for a few hours in the snow, ice and mud!